Cisco Prime Lan Management Solution_4_2.iso
Performing Installation of Cisco Prime LMS 4.2
This chapter describes how to install and uninstall LMS 4.2 on Soft Appliance, Solaris and Windows systems.
It describes the tasks you have to perform for installing LMS 4.2 on Soft Appliance, Solaris and Windows systems. It also helps you to verify the installation, uninstall, and reinstall LMS 4.2.

Note ![]() The term Virtual Appliance or Soft Appliance is used throughout LMS documentation, including Online Help. The term Virtual Appliance or Soft Appliance is used throughout LMS documentation, including Online Help.
The term Virtual Appliance or Soft Appliance is used throughout LMS documentation, including Online Help. The term Virtual Appliance or Soft Appliance is used throughout LMS documentation, including Online Help.
The installation process is explained in the following sections:
- Performing Installation of LMS 4.2
- Upgrading to LMS 4.2
- Verifying the Installation
- Accessing LMS Server
- Logging into Cisco Prime LMS Server
- Uninstalling LMS 4.2
- Re-installing LMS 4.2
- Downloading and Installing CiscoWorks LMS 4.2 Using Windows 2012 Patch
Performing Installation of LMS 4.2
This section explains how to install LMS 4.2 on Soft Appliance, Windows and Solaris systems for the first time. It contains:
- Downloading from Cisco.com
- Download Instructions for LMS 4.2 software on Soft Appliance - OVA Image
- Installation Procedure for Cisco Prime LMS 4.2 on Soft Appliance - OVA Image
- Extending File System in Soft Appliance
- Changing Server Configuration Details
- Viewing System Details
- Installing LMS 4.2 Soft Appliance - ISO Image
- Installing LMS 4.2 on Solaris
- Installing LMS 4.2 on Windows
- Installing LMS 4.2 in Silent Mode
The LMS 4.2 installation program takes approximately:
- 35 minutes to complete on Windows
- 35 minutes to complete on Solaris
- 50 minutes to complete on Soft Appliance (OVA image)
- 75 minutes to complete on Soft Appliance (ISO image)
On a single server with the recommended hardware requirements. See System and Browser Requirements for Server and Clientt for more information.
- You must disable the Anti Virus enabled in your system before installation of LMS 4.2.
- If HP Openview is running on your system, installation will take a longer time. Disable HP Openview to run a faster installation.
- You must have local Administrator privileges before beginning the installation. Only a user with local Administrator privileges can install or uninstall the product.
Note ![]() While setting up HA and DR environment in LMS server, ensure to set them prior to LMS installation. For further information on HA/DR configuration, see While setting up HA and DR environment in LMS server, ensure to set them prior to LMS installation. For further information on HA/DR configuration, see Setting Up Cisco Prime LMS in High Availability and Disaster Recovery Environment.
While setting up HA and DR environment in LMS server, ensure to set them prior to LMS installation. For further information on HA/DR configuration, see While setting up HA and DR environment in LMS server, ensure to set them prior to LMS installation. For further information on HA/DR configuration, see Setting Up Cisco Prime LMS in High Availability and Disaster Recovery Environment.
Downloading from Cisco.com
To download software from Cisco.com:
Step 1 ![]() Go to Support > Downloads > Cloud and Systems Management > Routing and Switching Management > Cisco Prime LAN Management Solution > Cisco Prime LAN Management Solution 4.2
Go to Support > Downloads > Cloud and Systems Management > Routing and Switching Management > Cisco Prime LAN Management Solution > Cisco Prime LAN Management Solution 4.2
Step 2 ![]() Based on the preferred operating system, choose one of the following from the software download page:
Based on the preferred operating system, choose one of the following from the software download page:
- Linux
- Windows
- Solaris
Step 3 ![]() Choose 4.2 from the drop-down list.
Choose 4.2 from the drop-down list.
Step 4 ![]() Download the required software.
Download the required software.
Download Instructions for LMS 4.2 software on Soft Appliance - OVA Image
This section explains:
- Important Download Notes for LMS 4.2 Software - OVA Image
- Downloading Multiple Small Files - OVA Image
- Download Instructions for LMS 4.2 software - OVA Image
Important Download Notes for LMS 4.2 Software - OVA Image
This section contains important information that you should read before you begin downloading:
- The split files of this update are not available in the Cisco Prime Software Updates page ( Admin > Software Center > Software Update) .
- You must not change the filename of the LMS 4.2 software image files.
- You must download all the split files to the same location.
- You can download the split files in any order.
- You must have a minimum of 16 GB of free space on your hard disk to download the LMS 4.2 Software.
Downloading Multiple Small Files - OVA Image
You can download LMS 4.2 Software for Soft Appliance as three split files.
To download these files, on cisco.com navigate to Support > Downloads > Cloud and Systems Management > Routing and Switching Management > Cisco Prime LAN Management Solution > Cisco Prime LAN Management Solution 4.2
Download Instructions for LMS 4.2 software - OVA Image
To download the LMS 4.2 Software OVA image from Cisco.com, you must do the following:
Step 1 ![]() Go to Support > Downloads > Cloud and Systems Management > Routing and Switching Management > Cisco Prime LAN Management Solution > Cisco Prime LAN Management Solution 4.2
Go to Support > Downloads > Cloud and Systems Management > Routing and Switching Management > Cisco Prime LAN Management Solution > Cisco Prime LAN Management Solution 4.2
Step 2 ![]() Click LMS Software.
Click LMS Software.
Step 3 ![]() Choose Linux platform.
Choose Linux platform.
Step 4 ![]() Choose 4.2 from the drop-down list.
Choose 4.2 from the drop-down list.
Step 5 ![]() Download the following files one by one depending on your requirement:
Download the following files one by one depending on your requirement:
- For 500 SKU
–![]() Cisco_Prime_LMS_4_2_500_OVA.part1
Cisco_Prime_LMS_4_2_500_OVA.part1
–![]() Cisco_Prime_LMS_4_2_500_OVA.part2
Cisco_Prime_LMS_4_2_500_OVA.part2
–![]() Cisco_Prime_LMS_4_2_OVA_Install.zip
Cisco_Prime_LMS_4_2_OVA_Install.zip
- For 1500 SKU
–![]() Cisco_Prime_LMS_4_2_1500_OVA.part1
Cisco_Prime_LMS_4_2_1500_OVA.part1
–![]() Cisco_Prime_LMS_4_2_1500_OVA.part2
Cisco_Prime_LMS_4_2_1500_OVA.part2
–![]() Cisco_Prime_LMS_4_2_OVA_Install.zip
Cisco_Prime_LMS_4_2_OVA_Install.zip
- For 5000 SKU
–![]() Cisco_Prime_LMS_4_2_5000_OVA.part1
Cisco_Prime_LMS_4_2_5000_OVA.part1
–![]() Cisco_Prime_LMS_4_2_5000_OVA.part2
Cisco_Prime_LMS_4_2_5000_OVA.part2
–![]() Cisco_Prime_LMS_4_2_OVA_Install.zip
Cisco_Prime_LMS_4_2_OVA_Install.zip
- Cisco_Prime_LMS_4_2_Install_User_Guide.zip
See Changing Server Configuration Details for information.
The End User License Agreement page appears.
Step 6 ![]() Click Accept to accept the license agreement and download the software.
Click Accept to accept the license agreement and download the software.
The File Download dialog box appears.
If you do not want to accept the license agreement, click Decline .
The License Agreement page appears when you download each file from Cisco.com.
Step 7 ![]() Click Save to save the LMS 4.2 software executable file on your system
Click Save to save the LMS 4.2 software executable file on your system ![]() .
.
After downloading all the files from Cisco.com, ensure that the downloaded files have the following checksum values:
- For 500 SKU
–![]() Cisco_Prime_LMS_4_2_500_OVA.part1—2389465459 -1149239296
Cisco_Prime_LMS_4_2_500_OVA.part1—2389465459 -1149239296
–![]() Cisco_Prime_LMS_4_2_500_OVA.part2—4076645703 -1832896000
Cisco_Prime_LMS_4_2_500_OVA.part2—4076645703 -1832896000
–![]() Cisco_Prime_LMS_4_2_OVA_Install.zip—2465571057 11581
Cisco_Prime_LMS_4_2_OVA_Install.zip—2465571057 11581
- For 1500 SKU
–![]() Cisco_Prime_LMS_4_2_1500_OVA.part1—2529185827 -1149239296
Cisco_Prime_LMS_4_2_1500_OVA.part1—2529185827 -1149239296
–![]() Cisco_Prime_LMS_4_2_1500_OVA.part2—1276220901 -1811941888
Cisco_Prime_LMS_4_2_1500_OVA.part2—1276220901 -1811941888
–![]() Cisco_Prime_LMS_4_2_OVA_Install.zip—2465571057 11581
Cisco_Prime_LMS_4_2_OVA_Install.zip—2465571057 11581
- For 5000 SKU
–![]() Cisco_Prime_LMS_4_2_5000_OVA.part1—850821717 -1149239296
Cisco_Prime_LMS_4_2_5000_OVA.part1—850821717 -1149239296
–![]() Cisco_Prime_LMS_4_2_5000_OVA.part2—4278752152 -1758971904
Cisco_Prime_LMS_4_2_5000_OVA.part2—4278752152 -1758971904
–![]() Cisco_Prime_LMS_4_2_OVA_Install.zip—2465571057 11581
Cisco_Prime_LMS_4_2_OVA_Install.zip—2465571057 11581
- Cisco_Prime_LMS_4_2_Install_User_Guide.zip—1679842211 523481
Installation Procedure for Cisco Prime LMS 4.2 on Soft Appliance - OVA Image
Read the following notes before installing the software:
- Ensure that your system meets the recommended hardware and software specifications specified in Server Requirements on Soft Appliance Systems.
- Installing the Soft Appliance on a virtualized environment takes approximately 30 minutes for deployment in local systems and 50 minutes for deployment in a network.
- Soft Appliance OVA software can be installed only on VMware environment.
- In VMWare, the resources should not be in shared mode.
- Ensure that you comment the line var/log/boot.log under syslog.conf, as this may consume more space in boot.log when the syslog size is huge.
Note ![]() You need not install any soft appliance image on the Virtual Machine (VM) before installing LMS 4.2, as the LMS 4.2 OVA image has embedded RedHat Enterprise Soft Appliance. You need not install any soft appliance image on the Virtual Machine (VM) before installing LMS 4.2, as the LMS 4.2 OVA image has embedded RedHat Enterprise Soft Appliance.
You need not install any soft appliance image on the Virtual Machine (VM) before installing LMS 4.2, as the LMS 4.2 OVA image has embedded RedHat Enterprise Soft Appliance. You need not install any soft appliance image on the Virtual Machine (VM) before installing LMS 4.2, as the LMS 4.2 OVA image has embedded RedHat Enterprise Soft Appliance.
- Unzip the downloaded Cisco_Prime_LMS_4_2_OVA_Install.zip file and extract the Cisco_Prime_LMS_4_2_OVA.bat file and checksum.exe.
- Ensure the checksum value of the Cisco_Prime_LMS_4_2_OVA.bat file is 3386523025 4055.
- Double click the Cisco_Prime_LMS_4_2_OVA.bat file to merge the two part files and generate a single Cisco_Prime_LMS_4_2.ova file.
- Ensure the checksum value of the ova files matches the values given below:
- For 500 SKU
Cisco_Prime_LMS_4_2_500.ova—2913504062 1312832000
- For 1500 SKU
Cisco_Prime_LMS_4_2_1500.ova—406671825 1333786112
- For 5000 SKU
Cisco_Prime_LMS_4_2_5000.ova—178322248 1386756096
To install the LMS 4.2 Soft Appliance (OVA image):
Step 1 ![]() Invoke the VMware vSphere Client.
Invoke the VMware vSphere Client.
Step 2 ![]() Enter the IP address or name of the host that needs to be directly managed. To manage multiple hosts, enter the IP address or name of a VCenter server.
Enter the IP address or name of the host that needs to be directly managed. To manage multiple hosts, enter the IP address or name of a VCenter server.
Step 3 ![]() Enter the username and password of the VMware server.
Enter the username and password of the VMware server.
Step 4 ![]() Click Login.
Click Login.
Step 5 ![]() Select File > Deploy OVF Template .
Select File > Deploy OVF Template .
The Deploy OVF Template - Source window appears, see Figure 6-1.
Figure 6-1 Deploy OVF Template - Source window
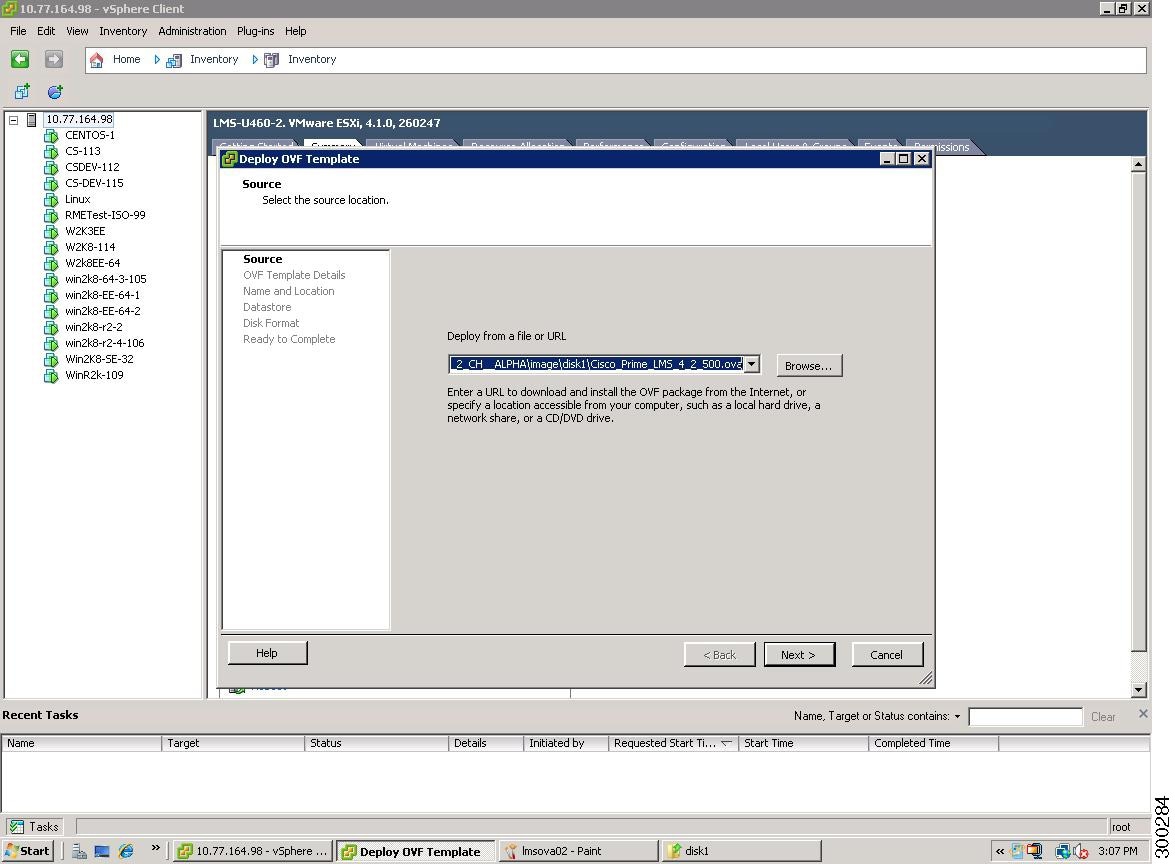
Step 6 ![]() C lick Browse to select the source OVF template from your local file system
C lick Browse to select the source OVF template from your local file system ![]() .
.
Step 7 ![]() Click Next .
Click Next .
The Deploy OVF Template - OVF Template Details window appears, see Figure 6-2. You can verify the OVF template details.
Figure 6-2 Deploy OVF Template - OVF Template Details window
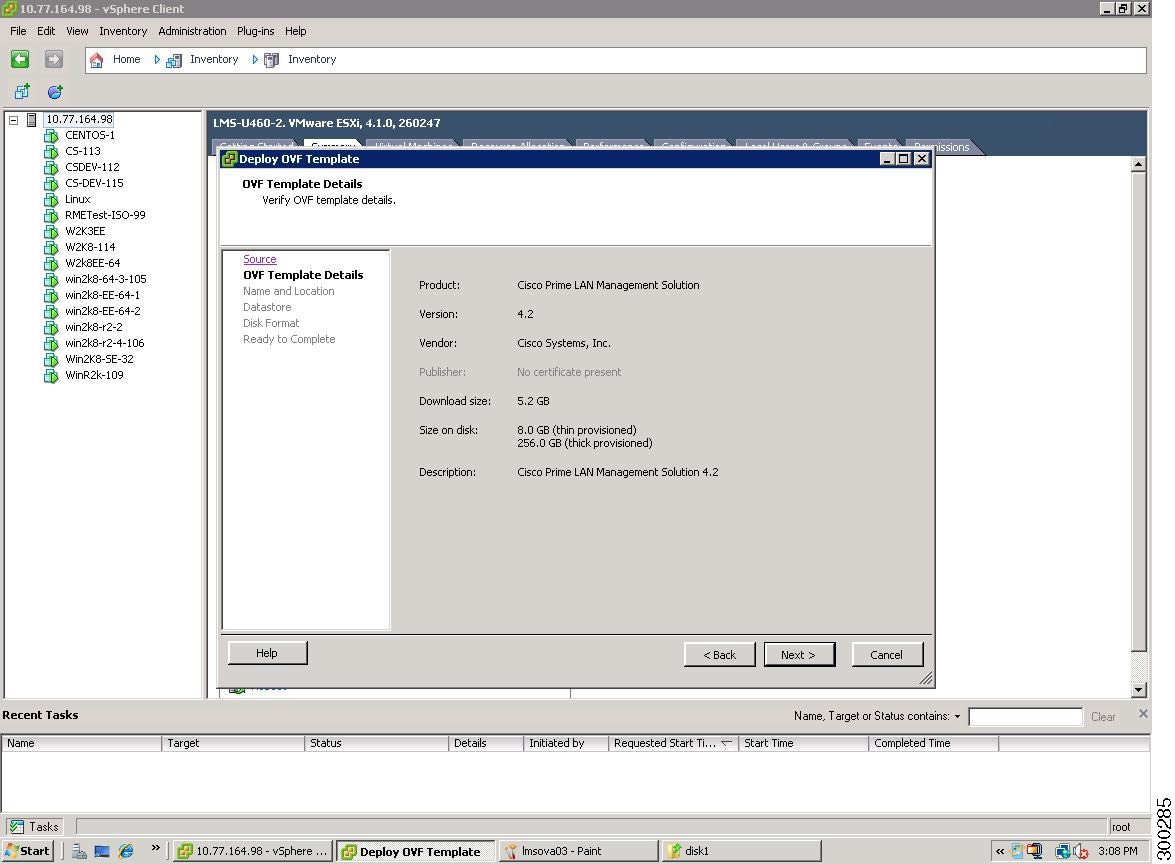
Step 8 ![]() Click Next .
Click Next .
The Deploy OVF Template - Name and Location window appears.
Figure 6-3 Deploy OVF Template - Name and Location window
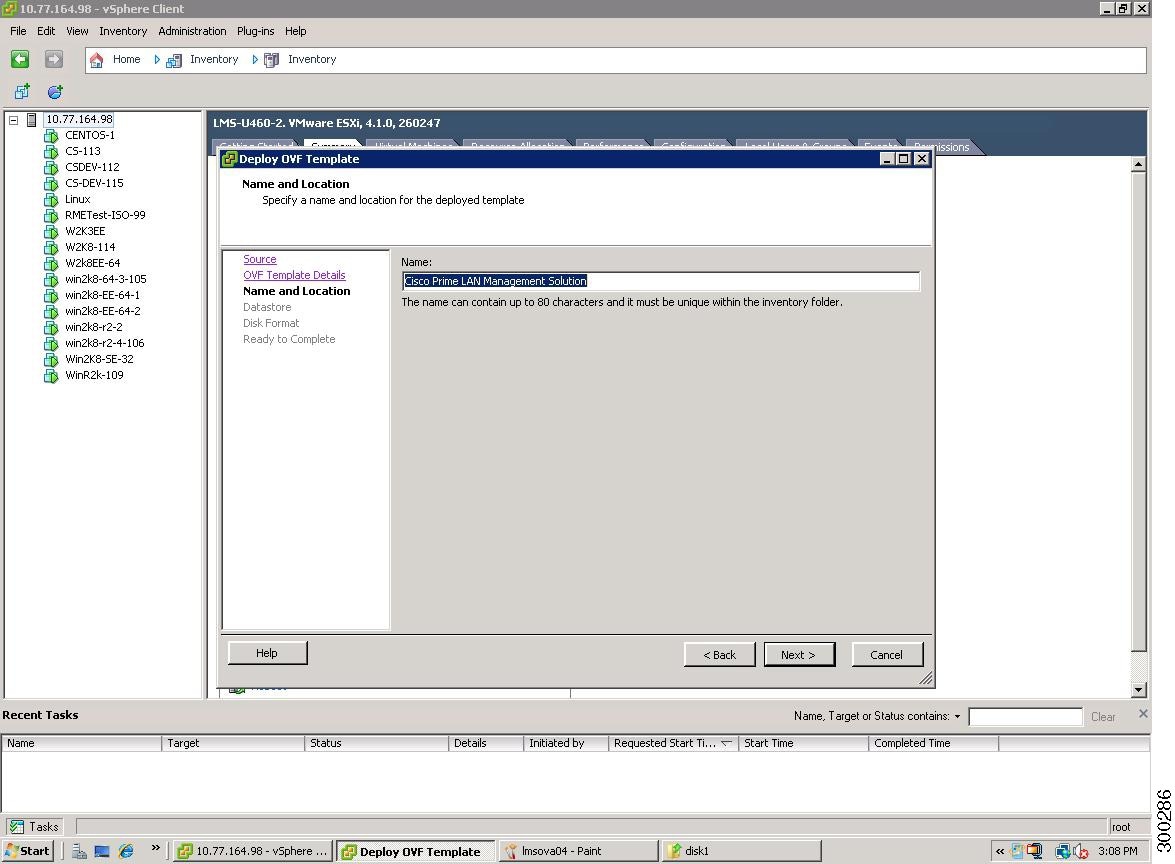
Step 9 ![]() Enter the name of the deployed template.
Enter the name of the deployed template.
Note ![]() Ensure that you provide a unique template name that does not exceed 80 characters. The unique template name refers to the virtual host deployed in the ESX/ESXi server. Ensure that you provide a unique template name that does not exceed 80 characters. The unique template name refers to the virtual host deployed in the ESX/ESXi server.
Ensure that you provide a unique template name that does not exceed 80 characters. The unique template name refers to the virtual host deployed in the ESX/ESXi server. Ensure that you provide a unique template name that does not exceed 80 characters. The unique template name refers to the virtual host deployed in the ESX/ESXi server.
Step 10 ![]() Click Next .
Click Next .
The Deploy OVF Template - Datastore window appears.
Figure 6-4 Deploy OVF Template - Datastore window
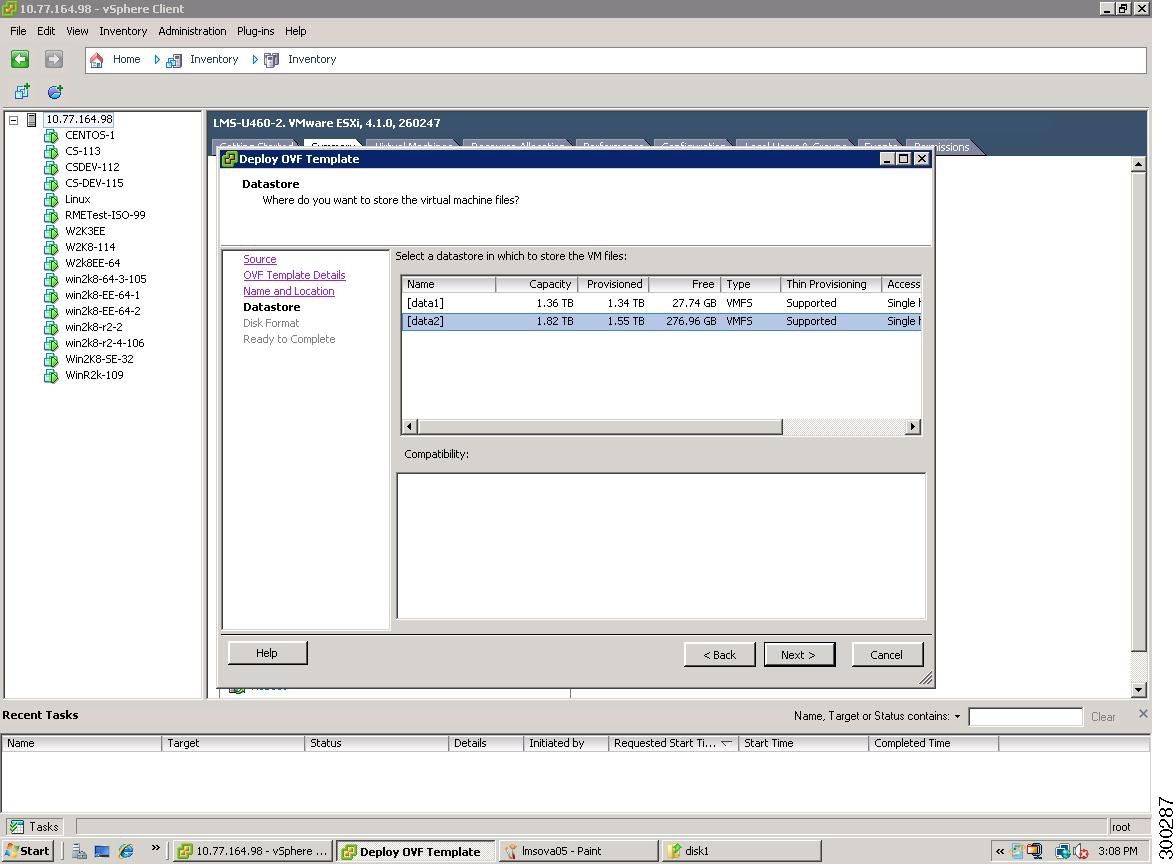
Step 11 ![]() Select a datastore where you want to store the virtual machine files.
Select a datastore where you want to store the virtual machine files.
Step 12 ![]() Click Next .
Click Next .
The Deploy OVF Template - Disk Format window appears.
Figure 6-5 Deploy OVF Template - Disk Format window
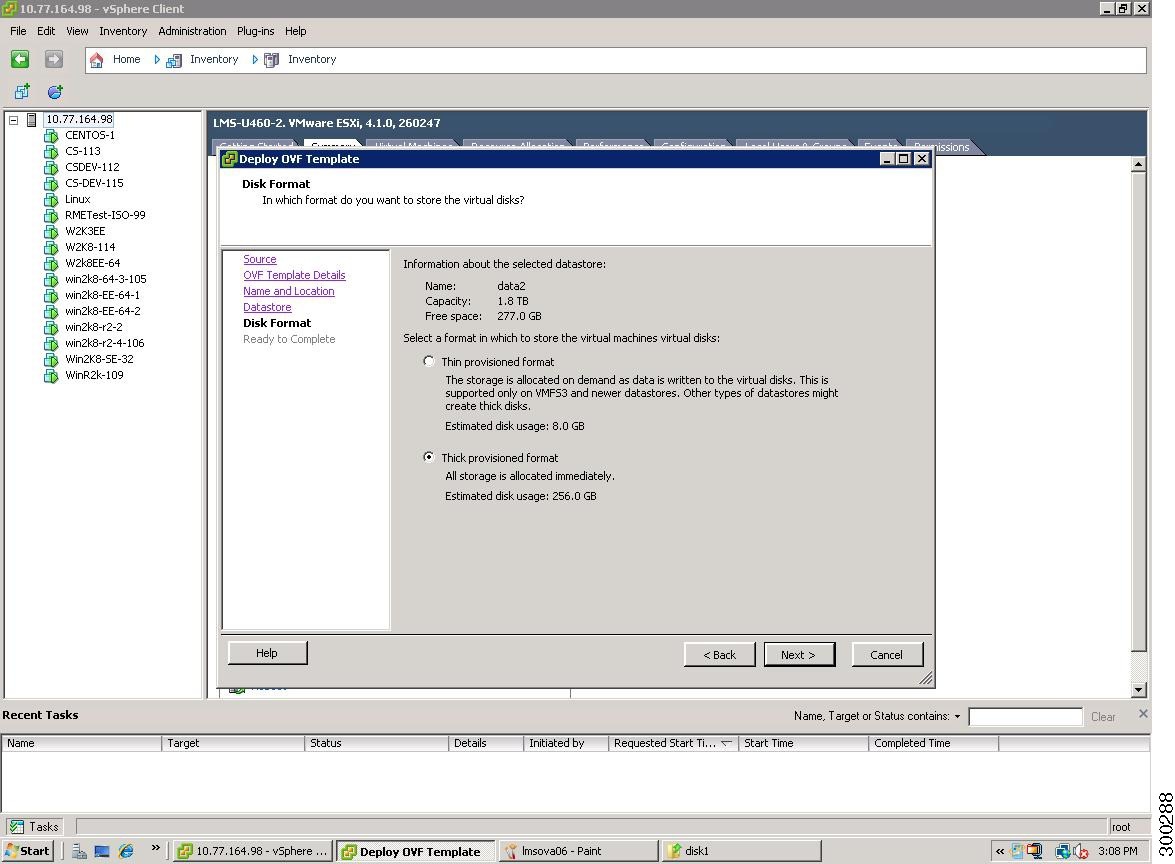
Step 13 ![]() You can select either the Thin provisioned format or Thick provisioned format.
You can select either the Thin provisioned format or Thick provisioned format.
Note Cisco recommends you to choose Thick provisioned format.
Step 14 ![]() Click Next .
Click Next .
The Deploy OVF Template - Ready to Complete window appears. This window displays the deployment setting details.
Figure 6-6 Deploy OVF Template - Ready to Complete window

Step 15 ![]() Click Finish to start the deployment task .
Click Finish to start the deployment task .
Note ![]() The deployment tasks take approximately 50 minutes to complete. The deployment tasks take approximately 50 minutes to complete.
The deployment tasks take approximately 50 minutes to complete. The deployment tasks take approximately 50 minutes to complete.
Step 16 ![]() Select a server which has the deployed template name specified in Step 9, from the servers listed on the left pane of the vSphere Client window.
Select a server which has the deployed template name specified in Step 9, from the servers listed on the left pane of the vSphere Client window.
Right-click the selected server and select Power > Power On to start the server.
Step 17 ![]() Select the Console tab.
Select the Console tab.
The Welcome screen appears.
Step 18 ![]() Press Enter in the console window to continue with the next step.
Press Enter in the console window to continue with the next step.
Step 19 ![]() Enter the following configuration details of the server:
Enter the following configuration details of the server:
- Hostname - You have to enter the server name and not FQDN.
Note The hostname should not exceed 19 characters.
- Default DNS Domain - You have to enter the domain name of the server. For example cisco.com.
- IP Address
- IP Netmask
- IP Default Gateway
- Primary Name Server
- Primary NTP Server
- Time Zone - You can enter the time zone value. Example Brazil/DeNoronha. See column 1 in for the list of values supported.
- Username - You can enter the username for this device. This user will have the privilege to enable shell access.
- Password
- Confirm Password
Step 20 ![]() The following message appears:
The following message appears:
For security reasons, passwords are not displayed. Do you want to view all the passwords? (Y/N) [N]:
Step 21 ![]() If you enter Y, the following passwords will be displayed.
If you enter Y, the following passwords will be displayed.
- admin user account password
- system identity user account password
- system generated database password
The default option is N.
The DB engine process takes 15 to 20 minutes.
Step 22 ![]() The server is automatically rebooted.
The server is automatically rebooted.
Note ![]() In case of any installation errors, you can check the install error log located at: /var/log/ade/ADE.log and /var/tmp/Cisco_Prime_Year_Month_Date.log. The installation log contains steps to download and install the latest Service Packs, Point Patches, Device Package updates, Config Templates or the User Tracking Utility 2.0 for LMS. In case of any installation errors, you can check the install error log located at: /var/log/ade/ADE.log and /var/tmp/Cisco_Prime_Year_Month_Date.log. The installation log contains steps to download and install the latest Service Packs, Point Patches, Device Package updates, Config Templates or the User Tracking Utility 2.0 for LMS.
In case of any installation errors, you can check the install error log located at: /var/log/ade/ADE.log and /var/tmp/Cisco_Prime_Year_Month_Date.log. The installation log contains steps to download and install the latest Service Packs, Point Patches, Device Package updates, Config Templates or the User Tracking Utility 2.0 for LMS. In case of any installation errors, you can check the install error log located at: /var/log/ade/ADE.log and /var/tmp/Cisco_Prime_Year_Month_Date.log. The installation log contains steps to download and install the latest Service Packs, Point Patches, Device Package updates, Config Templates or the User Tracking Utility 2.0 for LMS.
Note ![]() If you want to reboot the Windows, Solaris or VM server, you must do so only after stopping the daemons. You must not reboot the server while the daemons are running. If you want to reboot the Windows, Solaris or VM server, you must do so only after stopping the daemons. You must not reboot the server while the daemons are running.
If you want to reboot the Windows, Solaris or VM server, you must do so only after stopping the daemons. You must not reboot the server while the daemons are running. If you want to reboot the Windows, Solaris or VM server, you must do so only after stopping the daemons. You must not reboot the server while the daemons are running.
Extending File System in Soft Appliance
This section contains the information required to extend the logical volume in soft appliance after installation of OVA image.
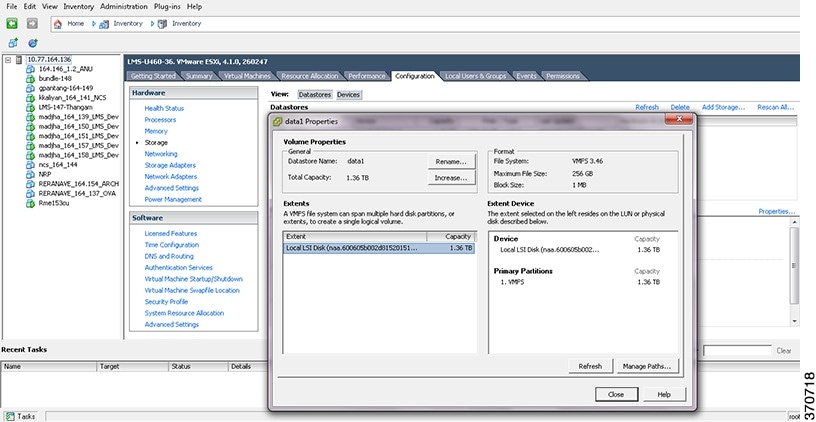
Note ![]() Before extending the file system, check the storage space on VM. Before extending the file system, check the storage space on VM.
Before extending the file system, check the storage space on VM. Before extending the file system, check the storage space on VM.
To check the file size in VMware, go to Configuration -> Storage -> Properties
Table 6-1 shows the VMware version and storage space details
| | |
|---|---|
| VMware ESXi 4.1.0 | 256 GB |
| VMware ESXi 5.0.0 | 2 TB |
| VMware ESXi 5.1.0 | 2 TB |
To check the used memory before adding new disk/new partition use the following command:
fdisk –l
Output of fdisk –l command in VMware 4.1.0
Disk /dev/sda: 161.0 GB, 161061273600 bytes
255 heads, 63 sectors/track, 19581 cylinders
Units = cylinders of 16065 * 512 = 8225280 bytes
Device Boot Start End Blocks Id System
/dev/sda1 * 1 13 104391 83 Linux
/dev/sda2 14 19453 156151800 8e Linux LVM
/dev/sda3 19454 19580 1020127+ 83 Linux
Here /dev/sda partition used 161.0 GB
Hence, We have remaining 89 GB, so we can extend this by creating a new partition
Note ![]() For VMWare 4.1.0, if fdisk shows 256 GB then we cannot extend using this disk as there is no space and new disk need to be created. For VMWare 4.1.0, if fdisk shows 256 GB then we cannot extend using this disk as there is no space and new disk need to be created.
For VMWare 4.1.0, if fdisk shows 256 GB then we cannot extend using this disk as there is no space and new disk need to be created. For VMWare 4.1.0, if fdisk shows 256 GB then we cannot extend using this disk as there is no space and new disk need to be created.
Note ![]() For VMWare 5.0.0 and VMWare 5.1.0, if fdisk shows 2 TB then we cannot extend using this disk as there is no space and new disk need to be created. For VMWare 5.0.0 and VMWare 5.1.0, if fdisk shows 2 TB then we cannot extend using this disk as there is no space and new disk need to be created.
For VMWare 5.0.0 and VMWare 5.1.0, if fdisk shows 2 TB then we cannot extend using this disk as there is no space and new disk need to be created. For VMWare 5.0.0 and VMWare 5.1.0, if fdisk shows 2 TB then we cannot extend using this disk as there is no space and new disk need to be created.
Note ![]() Add a new hard disk before creating a new partition. Add a new hard disk before creating a new partition.
Add a new hard disk before creating a new partition. Add a new hard disk before creating a new partition.
To check the used memory after adding new disk/new partition use the following command:
fdisk -l
Disk /dev/sda: 161.0 GB, 161061273600 bytes
255 heads, 63 sectors/track, 19581 cylinders
Units = cylinders of 16065 * 512 = 8225280 bytes
Device Boot Start End Blocks Id System
/dev/sda1 * 1 13 104391 83 Linux
/dev/sda2 14 19453 156151800 8e Linux LVM
/dev/sda3 19454 19580 1020127+ 83 Linux
Disk /dev/sdb: 21.4 GB, 21474836480 bytes
255 heads, 63 sectors/track, 2610 cylinders
Units = cylinders of 16065 * 512 = 8225280 bytes
Device Boot Start End Blocks Id System
/dev/sdb1 1 2610 20964793+ 8e Linux LVM
To Initialize a disk or a partition for use by LVM entering the following command:
pvcreate /dev/sdb1
For disk use the command pvcreate /dev/sdb
For partition use the command pvcreate /dev/sdb1
Creating new hard disk
To create a new hard disk, refer the following steps:
Step 1 ![]() Power off the VM and Click edit settings.
Power off the VM and Click edit settings.
Step 2 ![]() Select the hard disk and Click ADD button to add the hard disk.
Select the hard disk and Click ADD button to add the hard disk.

Creating new partition
To create a new partition after creating the new hard disk, enter the following commands:
# fdisk -l
Disk /dev/sda: 161.0 GB, 161061273600 bytes
#fdisk /dev/sda
#Type m
#Type n(add a new partition)
#Enter P(primary partition)
#Type p(Print the Partition table)
#Type V(verify the Partition)
#Type W(write table to disk and exit)
# reboot
#fdsik -l
Disk /dev/sdb: 21.4 GB, 21474836480 bytes
#mkfs.ext3 /dev/sdb
#Type m
#Type n(add a new partition)
#Type P(primary partition)
#Type P(Print the Partition table)
#Type V(verify the Partition)
#Type W(write table to disk and exit)
#reboot
#fdsik -l
#mkdir /Data
#mount /dev/sdb /Data
There are two modes of extending file system in Linux. They are listed below:
- Extending in Online Mode
- Extending in Offline Mode
Extending in Online Mode
For extending the logical volume in online mode use the following steps:
Step 1 ![]() Display all the partitions of the file system using the following command:
Display all the partitions of the file system using the following command:
Step 2 ![]() Initialize a disk or a partition for use by LVM by entering the following command:
Initialize a disk or a partition for use by LVM by entering the following command:
Step 3 ![]() Display the attributes of volume groups using the following command:
Display the attributes of volume groups using the following command:
Step 4 ![]() Enter the following command to add physical volumes to a volume group:
Enter the following command to add physical volumes to a volume group:
Step 5 ![]() Display the attributes of volume groups using the following command:
Display the attributes of volume groups using the following command:
Step 6 ![]() Display the attributes of a logical volume using the following command:
Display the attributes of a logical volume using the following command:
Step 7 ![]() Display the information about the logical volumes using the following command:
Display the information about the logical volumes using the following command:
Step 8 ![]() Enter the following command to extend the size of the logical volume by 2GB:
Enter the following command to extend the size of the logical volume by 2GB:
Step 9 ![]() Enter the following command to resize the ext2 file system:
Enter the following command to resize the ext2 file system:
Extending in Offline Mode
Note ![]() Extending file system in Offline mode causes entire data loss, so offline mode is not recommended. Extending file system in Offline mode causes entire data loss, so offline mode is not recommended.
Extending file system in Offline mode causes entire data loss, so offline mode is not recommended. Extending file system in Offline mode causes entire data loss, so offline mode is not recommended.
For extending the file system in offline mode using the following commands:
Changing Server Configuration Details
To change the configuration details of the server after installation:
Step 1 ![]() Login with Soft Appliance console administrator user account.
Login with Soft Appliance console administrator user account.
This is the sysadmin username that you provided during installation.
Step 2 ![]() Enter the password.
Enter the password.
Step 3 ![]() Enter the command
Enter the command shell .
Step 4 ![]() Enter the following command to stop the Daemons:
Enter the following command to stop the Daemons:
/etc/init.d/dmgtd stop
Step 5 ![]() Enter
Enter exit to go to the sysadmin mode.
Step 6 ![]() Enter the following command, in sysadmin view:
Enter the following command, in sysadmin view:
<HOSTNAME>/ sysadmin # config terminal
Enter the configuration commands, one per line. End with CNTL/Z.
In all the examples, sysadmin represents the sysadmin username that you provided during installation.
Step 7 ![]() Change the required configuration details of the server.
Change the required configuration details of the server.
You can change the hostname, Default DNS Domain, IP Address, IP Netmask, IP Default Gateway, Primary Name Server, Primary NTP Server, Time Zone, Username or Password. See Table 6-2 for more details.
Step 8 ![]() Enter the command
Enter the command end. The following will be displayed:
<HOSTNAME>/ sysadmin #
Step 9 ![]() Enter the following command to update the changes:
Enter the following command to update the changes:
<HOSTNAME>/ sysadmin # write memory
Step 10 ![]() Right-click the server and select Power > Reset to start the server.
Right-click the server and select Power > Reset to start the server.
Or
Enter the following command:
<HOSTNAME>/ sysadmin # reload
Save the Current ADE-OS running configuration ?(yes/no)[yes]?yes
Note You should reboot the server only if you change the following configuration details:
- Hostname
- Default DNS Domain
- IP Address, IP Netmask
- IP Default Gateway
- Primary Name Server
- Primary NTP Server
- Time Zone
The Daemons Manager will start automatically.
Step 11 ![]() Enter the following command to run the hostnamechange file:
Enter the following command to run the hostnamechange file:
<HOSTNAME>/ sysadmin # shell
Enter shell password:
/etc/init.d/dmgtd stop
[<HOSTNAME> /root-ade ~]# /opt/CSCOpx/bin/perl /opt/CSCOpx/bin/hostnamechange.pl -ohost <OLD_HOST_NAME> -nhost <NEW_HOST_NAME>
Note ![]() You should execute this command only when you change the hostname. Each time you change the hostnameof the server, you must perform, steps 1 to 9 to reflect the hostname changes in LMS. You should execute this command only when you change the hostname. Each time you change the hostnameof the server, you must perform, steps 1 to 9 to reflect the hostname changes in LMS.
You should execute this command only when you change the hostname. Each time you change the hostnameof the server, you must perform, steps 1 to 9 to reflect the hostname changes in LMS. You should execute this command only when you change the hostname. Each time you change the hostnameof the server, you must perform, steps 1 to 9 to reflect the hostname changes in LMS.
Step 12 ![]() Enter the following command to start the Daemons:
Enter the following command to start the Daemons:
sysadmin #/etc/init.d/dmgtd start
Note ![]() You must restart the Daemon Manager before and after you change the hostname. You must restart the Daemon Manager before and after you change the hostname.
You must restart the Daemon Manager before and after you change the hostname. You must restart the Daemon Manager before and after you change the hostname.
Note ![]() You must change the server configuration details only through Soft Appliance admin console. You must change the server configuration details only through Soft Appliance admin console.
You must change the server configuration details only through Soft Appliance admin console. You must change the server configuration details only through Soft Appliance admin console.
Table 6-2 lists the examples of how to change the Soft Appliance server configuration details.
| | |
| Change the HostName | |
| Change the Domain, Gateway and Name server | |
| Change the NTP Server | |
| Change the IP address and Subnet Mask | |
| Change the TimeZone | See Supported Server Time Zones and Offset Settings for more details. |
| Change the Username/ | |
Viewing System Details
Table 6-3 lists the show commands that you can use in the Soft Appliance server.
| | |
|---|---|
| application | Displays the application(s) information. To display all the installed applications, enter the following command: |
| cdp | Displays the CDP interface details. To display the CDP interface details, enter the following command: |
| clock | Displays the clock information. To display the current date, enter the following command: |
| cpu | Displays the CPU information. To display the CPU information, enter the following command: |
| disks | Displays the disk and filesystem information. To display the disk and file system information, enter the following command: |
| icmp_status | Displays the ICMP echo response configuration information. To display the ICMP echo response configuration information, enter the following command: |
| interface | Displays the interface information. To display Configuration of IP details, enter the following command: |
| inventory | Displays hardware inventory information. To display the hardware inventory information, enter the following command: |
| logging | Displays the system logging information. To display the logging information, enter the following command: |
| logins | Lists the login history. To display the state of system logins, enter the following command: |
| memory | Displays the memory information. To display the memory usage of all the running processes, enter the following command: |
| ntp | Displays the Network Time Protocol (NTP) server details. To show the status of the NTP server, enter the following command: |
| ports | Displays all processes listening on open ports. To display information about all the processes listening on the active ports, enter the following command: |
| process | Displays the system processes. To display information about the active processes, enter the following command: |
| running-config | Displays the current system operating configuration. To displays the contents of the current running configuration, enter the following command: |
| startup-config | Displays the startup system operating configuration. To display the contents of the startup configuration, enter the following command: |
| tech-support | Displays the tech output. To display the tech output, enter the following command: --More-- |
| terminal | Displays the terminal configuration parameters. To display the information about the terminal configuration, enter the following command: |
| timezone | Displays the timezone. To display the time zone as set on the system, enter the following command: SeeSupported Server Time Zones and Offset Settings for more details. |
| timezones | Displays the timezones. To obtain a list of time zones, enter the following commands: |
| udi | Displays the udi information. To display the information about the system's Unique Device Identifier (UDI), enter the following command: |
| uptime | Displays the system uptime. To display the system uptime, enter the following command: |
| users | Displays the logged-in users information. To display a list of users, enter the following command: |
| version | Displays the version details. To display all the installed application versions, enter the following command: |
| application status LMS | Displays the status of LMS applications. To display the status of LMS application, enter the following command: |
| application version LMS | Displays the version of the LMS application. To display LMS version, enter the following command: Cisco Prime LAN Management Solution ----------------------------------- Version : 4.2 Vendor : Cisco Systems, Inc. ----------------------------------- |
| logging application LMS | Displays the LMS installation log details. To display the LMS installation log, enter the following command: |
| logging system | Displays the system log details. To display system log, enter the following command: |
| ip route | Displays the system IP interface details. To display the information about the system IP interfaces, enter the following command: |
Note ![]() The configuration commands which are not listed in the table are not tested and not supported in Soft Appliance Server. The configuration commands which are not listed in the table are not tested and not supported in Soft Appliance Server.
The configuration commands which are not listed in the table are not tested and not supported in Soft Appliance Server. The configuration commands which are not listed in the table are not tested and not supported in Soft Appliance Server.
Table 6-4 lists the commands that are supported for admin users in Soft Appliance Server.
| | |
|---|---|
| exit | To exit from the EXEC mode. |
| nslookup | To enable DNS lookup for an IP address or a hostname. |
| ssh | To SSH to a remote IP address. |
| telnet | To Telnet to a remote IP address. |
| terminal | To set terminal line parameters. |
| traceroute | To trace the route to a remote IP address. |
| ping | To ping a remote IP address. |
Table 6-5 lists the commands that are supported for non admin users in Soft Appliance Server.
| | |
|---|---|
| exit | To exit from the EXEC mode. |
| nslookup | To enable DNS lookup for an IP address or a hostname. |
| ssh | To SSH to a remote IP address. |
| telnet | To Telnet to a remote IP address. |
| terminal | To set terminal line parameters. |
Table 6-6 lists the commands that are not supported for non admin users in Soft Appliance Server.
| | |
|---|---|
| traceroute | To trace the route to a remote IP address. |
| ping | To ping a remote IP address. |
Note ![]() Ping6 for IPV6 command is not supported for both admin and non admin users in Soft Appliance Server. Ping6 for IPV6 command is not supported for both admin and non admin users in Soft Appliance Server.
Ping6 for IPV6 command is not supported for both admin and non admin users in Soft Appliance Server. Ping6 for IPV6 command is not supported for both admin and non admin users in Soft Appliance Server.
Note ![]() Include the Syslog information in the /opt/CSCOpx/conf/syslog-entries.txt and run the "write mem" in the sysadmin console. Include the Syslog information in the /opt/CSCOpx/conf/syslog-entries.txt and run the "write mem" in the sysadmin console.
Include the Syslog information in the /opt/CSCOpx/conf/syslog-entries.txt and run the "write mem" in the sysadmin console. Include the Syslog information in the /opt/CSCOpx/conf/syslog-entries.txt and run the "write mem" in the sysadmin console.
Installing LMS 4.2 Soft Appliance - ISO Image
Read the following points before installing the software:
- Ensure that your system meets the recommended hardware and software specifications specified in Server Requirements on Soft Appliance Systems.
Note ![]() When there is more than one hard disk while installing LMS 4.2 (ISO image) in the UCS server, the installation will fail. In this scenario, you have to configure logical disk or convert all the disks to a single virtual disk in the BIOS setup before triggering the installation. When there is more than one hard disk while installing LMS 4.2 (ISO image) in the UCS server, the installation will fail. In this scenario, you have to configure logical disk or convert all the disks to a single virtual disk in the BIOS setup before triggering the installation.
When there is more than one hard disk while installing LMS 4.2 (ISO image) in the UCS server, the installation will fail. In this scenario, you have to configure logical disk or convert all the disks to a single virtual disk in the BIOS setup before triggering the installation. When there is more than one hard disk while installing LMS 4.2 (ISO image) in the UCS server, the installation will fail. In this scenario, you have to configure logical disk or convert all the disks to a single virtual disk in the BIOS setup before triggering the installation.
- You can install the ISO image of the LMS Soft Appliance only in a NCS and UCS series server. Refer to Downloading from Cisco.com for instructions on downloading the ISO image.
- It takes approximately one hour to install the Soft Appliance.
- If the virus scanner is enabled on your system, the installation might take longer time.
This section contains:
- Installing LMS 4.2 Soft Appliance on VMware
- Installing LMS 4.2 Soft Appliance on NCS and UCS Servers
Installing LMS 4.2 Soft Appliance on VMware
To install the LMS 4.2 Soft Appliance (ISO image):
Step 1 ![]() Invoke the VMware vSphere Client.
Invoke the VMware vSphere Client.
Step 2 ![]() Enter the IP address or host name of the host that needs to be directly managed.
Enter the IP address or host name of the host that needs to be directly managed.
To manage multiple multiple hosts, enter the IP address or name of a VCenter server.
Step 3 ![]() Enter the username and password of the VMware server.
Enter the username and password of the VMware server.
Step 4 ![]() Click Login.
Click Login.
Step 5 ![]() Create a server with system requirement or select an existing server from the servers listed on the left pane.
Create a server with system requirement or select an existing server from the servers listed on the left pane.
You must restart the server before starting the installation.
Step 6 ![]() Right-click the selected server and select Power > Reset to reboot the server.
Right-click the selected server and select Power > Reset to reboot the server.
A confirmation message appears. Click Yes to continue.
Step 7 ![]() Click the Console tab from the tabs displayed in the right pane and press Esc key to view the boot menu in the console.
Click the Console tab from the tabs displayed in the right pane and press Esc key to view the boot menu in the console.
In the boot menu the following options appear:
1. Removable Devices
2. Hard Drive
3. CD-ROM Drive
4. Network boot from Intel E1000
Step 8 ![]() Click the VMware tools CD icon and select CD/DVD Drive 1 > Connect to ISO image on local disk to mount the ISO in the VMware server .
Click the VMware tools CD icon and select CD/DVD Drive 1 > Connect to ISO image on local disk to mount the ISO in the VMware server .
Step 9 ![]() Navigate to the location where you have downloaded the software image and click Open.
Navigate to the location where you have downloaded the software image and click Open.
Step 10 ![]() Select the option CD-ROM Drive and press Enter to boot the ISO image.
Select the option CD-ROM Drive and press Enter to boot the ISO image.
A Welcome message appears:
Welcome to Cisco Prime LAN Management Solution 4.2
To boot from hard disk, press <Enter>
The following options appears:
- [1] Cisco Prime LAN Management Solution 4.2 Installation
This option allows you to perform installation of LMS 4.2.
- [2] Recover administrator password
This option allows you to recover the administration password. Follow Step 3 to Step 17 of Recovering Admin Password on Soft Appliance Installed on VMware, to recover the administration password.
- <Enter> Boot existing OS from Hard Disk
This allows you to boot up the existing OS available in the hard disk.
Step 11 ![]() Enter 1 to continue the installation.
Enter 1 to continue the installation.
All the applications of CARS and LMS are copied to the server, and the server gets rebooted.
Note ![]() It takes approximately 40 minutes to copy all the applications of CARS and LMS. It takes approximately 40 minutes to copy all the applications of CARS and LMS.
It takes approximately 40 minutes to copy all the applications of CARS and LMS. It takes approximately 40 minutes to copy all the applications of CARS and LMS.
Step 12 ![]() Type
Type setup in the console to set the configuration.
Step 13 ![]() Enter the following configuration details of the server:
Enter the following configuration details of the server:
- Hostname - You have to enter the server name and not FQDN.
- IP Address
- Subnetmask
- Gateway
- DNS Domain - You have to enter the domain name of the server. For example cisco.com.
- Primary Server Name
- Enter one of the following corresponding to Add/Edit another name server:
–![]() Enter Y to enter the secondary server name.
Enter Y to enter the secondary server name.
or
–![]() Enter N to proceed to NTP server configuration details.
Enter N to proceed to NTP server configuration details.
- Enter one of the following corresponding to primary NTP server.
–![]() Enter Y to enter the secondary NTP server name.
Enter Y to enter the secondary NTP server name.
or
–![]() Enter N to proceed to the next configuration details.
Enter N to proceed to the next configuration details.
- System Time Zone
- Time Zone
Type h to see the list of supported time zones, and enter the time zone value. For example, Brazil/DeNoronha. You can check Supported Server Time Zones and Offset Settings for the list of values supported.
- Username
Enter the username to access the LMS appliance console. This user will have the privilege to enable the shell access. The default username is sysadmin. You cannot use root as the username as it is a reserved username. You can use only alphanumeric characters for the username.
- Password
Enter the sysadmin password. By default, this password will be set as the shell password.
- Confirm Password
Enter the sysadmin password for confirmation. Enter Y to view the password.
- Admin Password
Enter the password for the admin account to log into LMS using the browser. This password must contain a minimum of five characters and will also be used for the System Identity account.
Note This is the password that you must use when you login to Cisco Prime LMS.
- Confirm Password
Enter the admin password for confirmation.
Step 14 ![]() The following message appears:
The following message appears:
Do you want to see the passwords at the end of the installation? (Y/N) [N]:
If you enter Y, the following passwords will be displayed before the server gets rebooted.
- admin user account password
- system identity user account password
- system generated database password
The default option is N.
Step 15 ![]() LMS installation continues after validating the specified configuration details. It takes approximately 25 minutes to complete the installation.
LMS installation continues after validating the specified configuration details. It takes approximately 25 minutes to complete the installation.
System gets rebooted on successful installation.
Note ![]() In case of any installation errors, you can check the install error log located at: In case of any installation errors, you can check the install error log located at:
In case of any installation errors, you can check the install error log located at: In case of any installation errors, you can check the install error log located at:
/var/log/ade/ADE.log and /var/tmp/ciscoworks_Year_Month_Date.log
Note ![]() If you want to reboot the Windows, Solaris or VM server, you must do so only after stopping the daemons. You must not reboot the server while the daemons are running. If you want to reboot the Windows, Solaris or VM server, you must do so only after stopping the daemons. You must not reboot the server while the daemons are running.
If you want to reboot the Windows, Solaris or VM server, you must do so only after stopping the daemons. You must not reboot the server while the daemons are running. If you want to reboot the Windows, Solaris or VM server, you must do so only after stopping the daemons. You must not reboot the server while the daemons are running.
Installing LMS 4.2 Soft Appliance on NCS and UCS Servers
To install LMS 4.2 Soft Appliance to NCS and UCS servers:
Step 1 Step 2 ![]() Insert Soft Appliance LMS 4.2 DVD into the server.
Insert Soft Appliance LMS 4.2 DVD into the server.
The following options appear in the console:
- Cisco Prime LAN Management Solution 4.2 Installation
This option allows you to perform installation of LMS 4.2.
- Recover administrator password
This option allows you to recover the administration password. See Recovering Admin Password on Soft Appliance Installed on NCS and UCS Server for more details.
Step 3 ![]() Enter 1 to continue the installation.
Enter 1 to continue the installation.
All the applications of CARS and LMS are copied to the server, and the server gets rebooted.
Note ![]() It takes approximately 40 minutes to copy all the applications of CARS and LMS. It takes approximately 40 minutes to copy all the applications of CARS and LMS.
It takes approximately 40 minutes to copy all the applications of CARS and LMS. It takes approximately 40 minutes to copy all the applications of CARS and LMS.
Step 4 ![]() Type
Type setup in the console to set the configuration.
Step 5 ![]() Enter the following configuration details of the server:
Enter the following configuration details of the server:
- Hostname - You have to enter the server name and not FQDN.
- IP Address
- Subnetmask
- Gateway
- DNS Domain - You have to enter the domain name of the server. For example cisco.com.
- Primary Server Name
- Enter one of the following corresponding to Add/Edit another name server:
–![]() Enter Y to enter the secondary server name.
Enter Y to enter the secondary server name.
or
–![]() Enter N to proceed to NTP server configuration details.
Enter N to proceed to NTP server configuration details.
- Enter one of the following corresponding to primary NTP server.
–![]() Enter Y to enter the secondary NTP server name.
Enter Y to enter the secondary NTP server name.
or
–![]() Enter N to proceed to the next configuration details.
Enter N to proceed to the next configuration details.
- System Time Zone
- Time Zone
Type h to see the list of supported time zones, and enter the time zone value. For example, Brazil/DeNoronha. You can check Supported Server Time Zones and Offset Settings for the list of values supported.
- Username
Enter the username to access the LMS appliance console. This user will have the privilege to enable the shell access. The default username is sysadmin. You cannot use root as the username as it is a reserved username. You can use only alphanumeric characters for the username.
- Password
Enter the sysadmin password. By default, this password will be set as the shell password.
- Confirm Password
Enter the sysadmin password for confirmation. Enter Y to view the password.
- Admin Password
Enter the password for the admin account to log into LMS using the browser. This password must contain a minimum of five characters and will also be used for the System Identity account.
Note This is the password that you must use when you login to Cisco Prime LMS.
- Confirm Password
Enter the admin password for confirmation.
Step 6 ![]() The following message appears:
The following message appears:
Do you want to see the passwords at the end of the installation? (Y/N) [N]:
If you enter Y, the following passwords will be displayed before the server gets rebooted.
- admin user account password
- system identity user account password
- system generated database password
The default option is N.
Step 7 ![]() LMS installation continues after validating the specified configuration details. It takes approximately 25 minutes to complete the installation.
LMS installation continues after validating the specified configuration details. It takes approximately 25 minutes to complete the installation.
System gets rebooted on successful installation.
Note ![]() In case of any installation errors, you can check the install error log located at: In case of any installation errors, you can check the install error log located at:
In case of any installation errors, you can check the install error log located at: In case of any installation errors, you can check the install error log located at:
/var/log/ade/ADE.log and /var/tmp/ciscoworks_Year_Month_Date.log
Note ![]() If you want to reboot the Windows, Solaris or VM server, you must do so only after stopping the daemons. You must not reboot the server while the daemons are running. If you want to reboot the Windows, Solaris or VM server, you must do so only after stopping the daemons. You must not reboot the server while the daemons are running.
If you want to reboot the Windows, Solaris or VM server, you must do so only after stopping the daemons. You must not reboot the server while the daemons are running. If you want to reboot the Windows, Solaris or VM server, you must do so only after stopping the daemons. You must not reboot the server while the daemons are running.
Recovering Admin Password on Soft Appliance Installed on NCS and UCS Server
To recover the administration password on Soft Appliance installed on NCS and UCS Server:
Step 1 Step 2 ![]() Insert Soft Appliance LMS 4.2 DVD into the server.
Insert Soft Appliance LMS 4.2 DVD into the server.
The following options appears in the console:
[1] Cisco Prime LAN Management Solution 4.2 Installation
[2] Recover administrator password
Step 3 ![]() Enter 2 to proceed with the password recovery process.
Enter 2 to proceed with the password recovery process.
The Admin Password Recover window appears.
Step 4 ![]() Enter the number corresponding to the admin username for which you want to recover the password.
Enter the number corresponding to the admin username for which you want to recover the password.
Note ![]() From the available list of admin usernames, you can recover the password only for the first five admin usernames. Password recovery is limited to the list of admin usernames listed. On specifying a value apart the listed number will return you an error message. From the available list of admin usernames, you can recover the password only for the first five admin usernames. Password recovery is limited to the list of admin usernames listed. On specifying a value apart the listed number will return you an error message.
From the available list of admin usernames, you can recover the password only for the first five admin usernames. Password recovery is limited to the list of admin usernames listed. On specifying a value apart the listed number will return you an error message. From the available list of admin usernames, you can recover the password only for the first five admin usernames. Password recovery is limited to the list of admin usernames listed. On specifying a value apart the listed number will return you an error message.
Step 5 ![]() Enter the new password.
Enter the new password.
The length of password should be a minimum of six characters. The password should comprise of minimum of one number, one lowercase and one uppercase character.
Step 6 ![]() Re-enter the password for confirmation.
Re-enter the password for confirmation.
Step 7 ![]() Enter y to save and reboot the system.
Enter y to save and reboot the system.
If you enter n, the new password will not be saved and you will be redirected to Step 4 to continue with password recovery process. The responses of y and n are not case sensitive.
Recovering Admin Password on Soft Appliance Installed on VMware
To recover the administration password on Soft Appliance installed on VMware:
Step 1 ![]() Go to http://software.cisco.com/download/release.html?mdfid=284259296&softwareid=280775102&release=4.2&os=Linux .
Go to http://software.cisco.com/download/release.html?mdfid=284259296&softwareid=280775102&release=4.2&os=Linux .
Step 2 ![]() Download the Cisco_Prime_LAN_Management_Solution_4_2.iso
Download the Cisco_Prime_LAN_Management_Solution_4_2.iso
Step 3 ![]() Invoke the VMware vSphere Client.
Invoke the VMware vSphere Client.
Step 4 ![]() Enter the IP address or hostname of the host that needs to be directly managed.
Enter the IP address or hostname of the host that needs to be directly managed.
Step 5 ![]() Enter the username and password of the VMware server.
Enter the username and password of the VMware server.
Step 6 ![]() Click Login.
Click Login.
Step 7 ![]() Select LMS server from the servers listed on the left pane for password recovery.
Select LMS server from the servers listed on the left pane for password recovery.
Step 8 ![]() Right-click the selected server and select Power > Reset to reboot the server.
Right-click the selected server and select Power > Reset to reboot the server.
A confirmation message appears. Click Yes to continue.
Step 9 ![]() Click the Console tab from the tabs displayed in the right pane and press Esc key to view the boot menu in the console.
Click the Console tab from the tabs displayed in the right pane and press Esc key to view the boot menu in the console.
In the boot menu, the following options appear:
1. Removable Devices
2. Hard Drive
3. CD-ROM Drive
4. Network boot from Intel E1000
Step 10 ![]() Click the VMware tools CD icon and select CD/DVD Drive 1 > Connect to ISO image on local disk to mount the ISO in the VMware server .
Click the VMware tools CD icon and select CD/DVD Drive 1 > Connect to ISO image on local disk to mount the ISO in the VMware server .
Step 11 ![]() Navigate to the location where you have downloaded the software image and click Open.
Navigate to the location where you have downloaded the software image and click Open.
Step 12 ![]() Select the option CD-ROM Drive and press Enter to boot the ISO image.
Select the option CD-ROM Drive and press Enter to boot the ISO image.
The following options appear in the console:
[1] Cisco Prime LAN Management Solution 4.2 Installation
[2] Recover administrator password
Step 13 ![]() Enter 2 to proceed with the password recovery process.
Enter 2 to proceed with the password recovery process.
The Admin Password Recover window appears.
Step 14 ![]() Enter the number corresponding to the admin username for which you want to recover the password.
Enter the number corresponding to the admin username for which you want to recover the password.
Note ![]() From the available list of admin usernames, you can recover the password only for the first five admin usernames. Password recovery is limited to the list of admin usernames listed. On specifying a value apart from those listed will return you an error message. From the available list of admin usernames, you can recover the password only for the first five admin usernames. Password recovery is limited to the list of admin usernames listed. On specifying a value apart from those listed will return you an error message.
From the available list of admin usernames, you can recover the password only for the first five admin usernames. Password recovery is limited to the list of admin usernames listed. On specifying a value apart from those listed will return you an error message. From the available list of admin usernames, you can recover the password only for the first five admin usernames. Password recovery is limited to the list of admin usernames listed. On specifying a value apart from those listed will return you an error message.
Step 15 ![]() Enter the new password.
Enter the new password.
The length of password should be a minimum of six characters. The password should comprise of minimum of one number, one lowercase, and one uppercase character.
Step 16 ![]() Re-enter the password for confirmation.
Re-enter the password for confirmation.
Step 17 ![]() Enter y to save and reboot the system.
Enter y to save and reboot the system.
If you enter n, the new password will not be saved and you will be redirected to Step 14 to continue with password recovery process. The responses of y and n are not case sensitive.
Installing LMS 4.2 on Solaris
To install LMS 4.2 for the first time on a Solaris system:
Step 1 ![]() Log into the machine where you want to install LMS 4.2.
Log into the machine where you want to install LMS 4.2.
Step 2 ![]() Insert the LMS 4.2 DVD.
Insert the LMS 4.2 DVD.
Note ![]() We recommend that you run the installation from a local DVD or a local hard drive to avoid errors that may result from the network being slow or busy. We recommend that you run the installation from a local DVD or a local hard drive to avoid errors that may result from the network being slow or busy.
We recommend that you run the installation from a local DVD or a local hard drive to avoid errors that may result from the network being slow or busy. We recommend that you run the installation from a local DVD or a local hard drive to avoid errors that may result from the network being slow or busy.
Installation from local hard drive will be faster than installation from DVD.
If you want to install from a local hard drive, you must copy the contents from the DVD to the local hard drive. Ensure that you copy the entire contents from the DVD to the hard drive. For more information on copying the contents from the DVD to the hard drive, see Installation Notes (For Solaris Only)
Step 3 ![]() Copy the downloaded software image to a directory having minimum of 10 GB free space.
Copy the downloaded software image to a directory having minimum of 10 GB free space.
Step 4 ![]() Change the execution mode of permission to setup.sh by entering:
Change the execution mode of permission to setup.sh by entering:
# chmod +x setup.sh
Step 5 ![]() Run the installation setup script by entering:
Run the installation setup script by entering:
# sh setup.sh
Or
#./setup.sh
A Welcome message appears:
Welcome to Cisco Prime LAN Management Solution 4.2 Applications setup program.
A prompt appears:
Press ENTER to read the following License Agreement, or Press n to proceed with
setup? (y/n) [y]:
- If you enter y, you can view the license agreement details.
- If you enter n, the following prompt appears:
You must accept this License Agreement to proceed with the installation.
If you enter n, the installation will abort.
Do you accept all the terms of the License Agreement? (y/n) [n]:
Step 6 ![]() Enter y to proceed.
Enter y to proceed.
The following message appears:
Enter the location where the product will be installed. The default location is /opt/CSCOpx. If you choose another location, installation will create a symbolic link /opt/CSCOpx to that location.
Destination folder should not contain the following characters:-
! @ # $ % ^ & * ( ) + | } { " : [ ] ; ' ? < > , . ` = ~
Enter location or q to quit [/opt/CSCOpx]:
The Custom path or location you specify cannot be the sub-directory of /opt/CSCOpx.

Step 7 ![]() Press Enter to accept the default directory for product installation, or enter another directory.
Press Enter to accept the default directory for product installation, or enter another directory.
Make sure you have sufficient disk space. For disk space requirements, see System and Browser Requirements for Server and Client.
Step 8 ![]() Enter any of the following to specify the license for LMS 4.2:
Enter any of the following to specify the license for LMS 4.2:
- L to provide the License file location.
- E for an evaluation mode. In this mode, you can provide license information later to fully enable the product. This is the default option.
- Q to quit the installation.
Note ![]() If you do not have a license, you can select the Evaluation Mode. You must obtain a valid License Key within 60 days. If you do not have a license, you can select the Evaluation Mode. You must obtain a valid License Key within 60 days.
If you do not have a license, you can select the Evaluation Mode. You must obtain a valid License Key within 60 days. If you do not have a license, you can select the Evaluation Mode. You must obtain a valid License Key within 60 days.
After specifying the License file for LMS 4.2, the Login Password prompt appears.
Step 9 ![]() Enter the LMS Login password and confirm it.
Enter the LMS Login password and confirm it.
The alert message appears prompting you to use the login password as database password (Y/N)?
If you enter Y, the system uses the login password as database password. If you enter N, the system generates random password for database.
The system uses Login password for Admin and System Identity Account passwords, and generates a random password for casuser account.
After entering the password details, the following message appears:
Do you want to see the passwords at the end of installation? (y/n) [n]:
If you enter Y, the following prompt appears:
Passwords will be displayed in an unencrypted form. Ensure security of the passwords. Enter y to continue
Step 10 ![]() Enter Y, all the passwords will be displayed at the end of installation.
Enter Y, all the passwords will be displayed at the end of installation.
If you enter N, the passwords will not be displayed.
Installation now proceeds. The installation completes without displaying more questions and the system prompt appears.
The following messages appear at the end of the installation:
Software Installation Tool Completed
Possible Warnings/Errors Encountered
The warning and error messages that appear after these messages do not hinder the installation. They only indicate that you need to take corrective actions after the installation has been completed.
Note ![]() If you have specified LMS 10,000 devices license, the following warning message appears: If you have specified LMS 10,000 devices license, the following warning message appears:
If you have specified LMS 10,000 devices license, the following warning message appears: If you have specified LMS 10,000 devices license, the following warning message appears:
If the number of managed devices exceeds 5000, only Inventory, config, and Image Management functions can remain enabled. Select Admin > System > Device Management Functions to disable the other functions. However, you can setup LMS in another server to enable all the other functions for the additional devices.
Note ![]() The installation log contains steps to download and install the latest Service Packs, Point Patches, Device Package updates, Config Templates or the User Tracking Utility 2.0 for LMS. The installation log contains steps to download and install the latest Service Packs, Point Patches, Device Package updates, Config Templates or the User Tracking Utility 2.0 for LMS.
The installation log contains steps to download and install the latest Service Packs, Point Patches, Device Package updates, Config Templates or the User Tracking Utility 2.0 for LMS. The installation log contains steps to download and install the latest Service Packs, Point Patches, Device Package updates, Config Templates or the User Tracking Utility 2.0 for LMS.
Note ![]() If cluster patches are installed for Solaris 10, you must reboot your system after installing LMS. If cluster patches are installed for Solaris 10, you must reboot your system after installing LMS.
If cluster patches are installed for Solaris 10, you must reboot your system after installing LMS. If cluster patches are installed for Solaris 10, you must reboot your system after installing LMS.
To prepare the client system for use, see System and Browser Requirements for Server and Client.
For troubleshooting information, see Checking Processes After Installation and Understanding Installation Error Messages.
Installing LMS 4.2 on Windows
To install LMS 4.2 for the first time on a Windows system:
Step 1 ![]() Login as administrator to the machine where you want to install LMS 4.2.
Login as administrator to the machine where you want to install LMS 4.2.
Step 2 ![]() Insert the LMS 4.2 DVD.
Insert the LMS 4.2 DVD.
Note ![]() We recommend that you run the installation from a local DVD or a local hard drive to avoid errors that may result from the network being slow or busy. We recommend that you run the installation from a local DVD or a local hard drive to avoid errors that may result from the network being slow or busy.
We recommend that you run the installation from a local DVD or a local hard drive to avoid errors that may result from the network being slow or busy. We recommend that you run the installation from a local DVD or a local hard drive to avoid errors that may result from the network being slow or busy.
Installation from local hard drive will be faster than installation from DVD.
If you want to install from a local hard drive, you must copy the contents from the DVD to the local hard drive. Ensure that you copy the entire contents from the DVD to the hard drive.
Step 3 ![]() Double-click on the autorun.exe or setup.exe file.
Double-click on the autorun.exe or setup.exe file.
The Prerequisites window appears.
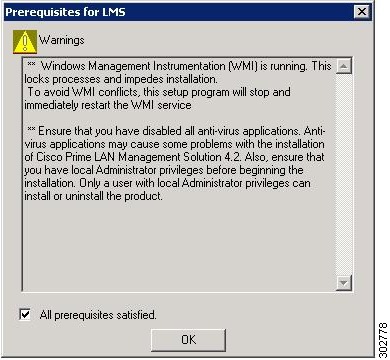
Step 4 ![]() Read the prerequisite details and click OK .
Read the prerequisite details and click OK .
The LMS Setup window appears.

Step 5 ![]() Select I accept the terms of the license agreement checkbox.
Select I accept the terms of the license agreement checkbox.
To view the license details, click View button.
Step 6 ![]() Click Browse button to choose the destination folder where Cisco Prime LMS will be installed.
Click Browse button to choose the destination folder where Cisco Prime LMS will be installed.
The Choose Destination Folder dialog box appears.
Destination folder should not contain the following characters:-
! @ # $ % ^ & * ( ) + | } { " : [ ] ; ' ? < > , . ` = ~
The default folder is SystemDrive:\Program Files\CSCOpx.
Step 7 ![]() Select one of the following:
Select one of the following:
- Eval - If you do not have a license you can select the Eval, which is the default option and follow Step 9. You must obtain a valid License Key within 60 days.
- Purchase - If you have purchased a license with the product you can select Purchase.
Step 8 ![]() Click Browse button to specify the License File Location, if you have selected Purchase license information.
Click Browse button to specify the License File Location, if you have selected Purchase license information.
To view the system requirement details, click View button.
If the system requirement is not met, see Server Requirements on Windows Systems
Step 9 ![]() Enter the Login password.
Enter the Login password.
For more information on passwords, see LMS Login and Database Passwords.
The system uses Login password for Admin and System Identity Account passwords, and generates a random password for casuser account.
Step 10 ![]() Re-enter the Login password to confirm.
Re-enter the Login password to confirm.
Step 11 ![]() Select Use the above password for the Database checkbox if you want to use the Login password as your database password.
Select Use the above password for the Database checkbox if you want to use the Login password as your database password.
If you do not select the checkbox, database password will be generated randomly.
Step 12 ![]() Click Install to continue.
Click Install to continue.
The Reboot window appears after the installation is complete.
The Reboot window has view buttons that allow you to view the following details:
- Errors and Warnings
- Installation Information
- Password Details
- Health Monitor Report
Errors and Warnings
The View button will be enabled only if errors are encountered during installation. You can view the error details on clicking the View button.
Installation Information
Provides information on how to download and install the latest Service Packs, Point Patches, Device Package updates, Config Templates, or the User Tracking Utility 2.0. You must obtain a valid license key from Cisco.com within 60 days. If the number of managed devices exceeds 5000, only Inventory, config, and Image Management functions can remain enabled. Select Admin > System > Device Management Functions to disable the other functions. However, you can setup LMS in another server to enable all the other functions for the additional devices.
Password Details
Allows you to view the following LMS Password details:
- User Admin Password
- User Guest Password
- System Identity Account Password
- Database Password
Health Monitor Report
The Health Monitor report provides the following Hardware Parameter details:
- Memory availability
- Swap
- CPU
- DSN
- Backup status
- Number of MIB objects being polled
- Maximum number of MIB objects that can be managed
- Syslog database size
Step 13 ![]() Click Reboot button to restart your machine.
Click Reboot button to restart your machine.
To restart your machine later, click Reboot Later button.
To prepare the client system for use, see System and Browser Requirements for Server and Client.
For troubleshooting information, see Checking Processes After Installation and Understanding Installation Error Messages.
Installing LMS 4.2 in Silent Mode
Silent installation or unattended installation is supported in the LMS single installer. You can perform only a fresh installation of LMS 4.2 in silent installation mode.
Silent install does not prompt for your inputs. It continues the installation based on your inputs provided in a file. You should save the installation inputs in a file and store the file in the system. See Creating an Answer File and Sample Answer Files for more information.
To install LMS 4.2 in silent mode:
Step 1 ![]() Insert the LMS 4.2 DVD.
Insert the LMS 4.2 DVD.
Note ![]() We recommend that you run the installation from a local DVD or a local hard drive to avoid errors that may result from the network being slow or busy. We recommend that you run the installation from a local DVD or a local hard drive to avoid errors that may result from the network being slow or busy.
We recommend that you run the installation from a local DVD or a local hard drive to avoid errors that may result from the network being slow or busy. We recommend that you run the installation from a local DVD or a local hard drive to avoid errors that may result from the network being slow or busy.
Installation from local hard drive will be faster than installation from DVD.
If you want to install from a local hard drive, you must copy the contents from the DVD to the local hard drive. Ensure that you copy the entire contents from the DVD to the hard drive.
Step 2 ![]() Navigate to images/disk1 directory at the command prompt.
Navigate to images/disk1 directory at the command prompt.
Step 3 ![]() Enter the following commands to install LMS 4.2 in silent mode:
Enter the following commands to install LMS 4.2 in silent mode:
- On Solaris: sh setup.sh -q answer_file_name
- On Windows: setup.exe QUIET answerfile= answer_file_name
where answer_file_name is the full path of the user input file stored on the system.
The installation starts.
Step 4 ![]() Restart your system after the installation is complete.
Restart your system after the installation is complete.
Creating an Answer File
The answer file is an ASCII file that provides the required inputs for quiet installations.
The answer file contains the following name=value pairs:
| | |
| destination | Optional. Allows quiet installation to install into a directory other than NMSROOT . If not specified, installation goes into /opt/CSCOpx on Solaris or c:\Program Files\CSCOpx on Windows. |
| adminPassword | Specifies the login password for the admin user. This is mandatory. |
| secretPassword (Solaris only) | Specifies the login password for the secret user. |
| casuser (Windows Only) | If casuser password does not exist by the time of installation, the framework generates random password for casuser.
In quiet mode, installation attempts to load the casuser password from the answer file. If no casuser password is specified in the answer file, installation attempts random password, and might fail if the random password does not pass the company policy. |
| systemIdentityAccountPassword (Windows only) | Password for the System Identity Account. This is mandatory. |
Sample Answer Files
On Windows:
#--- begin answer file
#--- hash sign (#) is allowed to mark comments
systemIdentityAccountPassword=admin
casuser=casuser
destination=C:\PROGRA~2\CSCOpx
adminPassword=admin
#--- end of answer file
On Solaris:
#cat /tmp/answer_file
##Sample Answer file
adminPassword=admin
secretPassword=admin
destination=/opt/CSCOpx
The sample answer files are also available in the Software image at the directory disk1/install.
Upgrading to LMS 4.2
The following upgrade paths are supported:
| | | |
|---|---|---|
| LMS 4.1 | Remote migration | 1. 2. 3. |
| Direct inline migration | 1. The data is automatically migrated during installation. | |
| LMS 4.0.1 | Remote migration | 1. 2. 3. |
| Direct inline migration | 1. The data is automatically migrated during installation. | |
| LMS 3.2 SP1 | Remote migration | 1. 2. 3. |
| LMS 2.6, LMS 2.6 SP1, LMS 3.0, LMS 3.0 December 2007 update, LMS 3.1 | Remote migration Direct inline upgrade to LMS 4.2 is not supported. The suggested upgrade path is: LMS 2.6/LMS 2.6 SP1/ LMS 3.0/LMS 3.0 December 2007 update/LMS 3.1> LMS 3.2 >LMS 4.0 > LMS 4.01 > LMS 4.2 | 1. 2. 3. http://www.cisco.com/en/US/docs/net_mgmt/ciscoworks_lan_management_solution/4.0/install/guide/dmg.html 4. From LMS 4.0.1 to LMS 4.2, you can perform direct inline or remote upgrade, click here for more details. |
| LMS 2.2, LMS 2.5, LMS 2.5.1 | Remote migration Direct inline upgrade to LMS 4.2 is not supported. The suggested upgrade path is: LMS 2.2 / LMS 2.5 / LMS 2.5.1 > LMS 2.6 > LMS 4.0 > LMS 4.0.1 >LMS 4.2 | 1. 2. – – – 3. 4. http://www.cisco.com/en/US/docs/net_mgmt/ciscoworks_lan_management_solution/4.0/install/guide/dmg.html 5. From LMS 4.0.1 to LMS 4.2, you can perform direct inline or remote upgrade, click here for more details. |
Inline Upgrade to LMS 4.2 on Soft Appliance
To upgrade from LMS 4.1 to LMS 4.2:
Step 1 ![]() Download the Cisco_Prime_LAN_Management_Solution_4_2_Upgrade.tar.gz file from CCO or DVD.
Download the Cisco_Prime_LAN_Management_Solution_4_2_Upgrade.tar.gz file from CCO or DVD.
Step 2 ![]() Copy the Cisco_Prime_LAN_Management_Solution_4_2_Upgrade.tar.gz to local disk partition of LMS 4.1 installed server (/localdisk).
Copy the Cisco_Prime_LAN_Management_Solution_4_2_Upgrade.tar.gz to local disk partition of LMS 4.1 installed server (/localdisk).
Step 3 ![]() Login with your credentials to the VM Console through Vsphere client.
Login with your credentials to the VM Console through Vsphere client.
Step 4 ![]() Create either a local or remote repository. A repository contains URL and credential details
Create either a local or remote repository. A repository contains URL and credential details
myhost/admin# configure terminal
myhost/admin(config)# repository <<myrepo>>
myhost/admin(config-Repository)# url ?
<WORD> Enter repository URL, including server and path info (Max Size - 80)
cdrom: Local CD-ROM drive (read only)
disk: Local storage
ftp: URL using a FTP server
http: URL using a HTTP server (read only)
https: URL using a HTTPS server (read only)
nfs: URL using a NFS server
sftp: URL using a SFTP server
tftp: URL using a TFTP server
Step 5 ![]() Combine the URL to the repository that uses a local or remote storage.
Combine the URL to the repository that uses a local or remote storage.
a. ![]() The following IOS CLI shows how to combine the URL to a repository that uses a local storage:
The following IOS CLI shows how to combine the URL to a repository that uses a local storage:
Before creating repository copy the downloaded Cisco_Prime_LAN_Management_Solution_4_2_Upgrade.tar.gz to /localdisk partition of LMS 4.1 installed server.
myhost/admin(config-Repository)# url disk:
myhost/admin(config-Repository)# exit
myhost/admin(config)# exit
myhost/admin# write mem
Generating configuration...
myhost/admin#
b. ![]() The following IOS CLI shows how to combine the URL to a repository that uses an anonymous FTP server:
The following IOS CLI shows how to combine the URL to a repository that uses an anonymous FTP server:
myhost/admin(config-Repository)# url ftp://<<ftp_location>>
myhost/admin(config-Repository)# user <<ftp_username>> password plain <<ftp_password>>
myhost/admin(config-Repository)# exit
myhost/admin(config)# exit
myhost/admin# write mem
Generating configuration...
myhost/admin#
You can use the above mentioned steps for other protocols.
Step 6 ![]() Run the below command in the admin console in VSphere client.
Run the below command in the admin console in VSphere client.
myhost/admin#application upgrade Cisco_Prime_LAN_Management_Solution_4_2_Upgrade.tar.gz <<myrepo>>
Save the ADE-OS running configuration?(yes/no) [yes]?
Step 7 ![]() Press Enter to continue with LMS 4.2 upgrade.
Press Enter to continue with LMS 4.2 upgrade.
Note ![]() LMS 4.2 upgrade on Soft Appliance takes approximately more than one hour in the local server. You should use the appliance server only after upgrade process is complete and when the login prompt appears. LMS 4.2 upgrade on Soft Appliance takes approximately more than one hour in the local server. You should use the appliance server only after upgrade process is complete and when the login prompt appears.
LMS 4.2 upgrade on Soft Appliance takes approximately more than one hour in the local server. You should use the appliance server only after upgrade process is complete and when the login prompt appears. LMS 4.2 upgrade on Soft Appliance takes approximately more than one hour in the local server. You should use the appliance server only after upgrade process is complete and when the login prompt appears.
Inline Upgrade to LMS 4.2 on Windows
The LMS 4.2 inline upgrade procedure for Windows is same as the installation procedure explained in the section Installing LMS 4.2 on Windows. Specify the backup folder during inline upgrade to LMS 4.2.
Inline Upgrade to LMS 4.2 on Solaris
The LMS 4.2 inline upgrade procedure for Solaris is same as the installation procedure explained in the section Installing LMS 4.2 on Solaris. Specify the backup folder during inline upgrade to LMS 4.2.
Remote Upgrade to LMS 4.2
This section contains information on:
- Remote Upgrade to LMS 4.2 on Solaris
- Remote Upgrade to LMS 4.2 on Windows
Remote Upgrade to LMS 4.2 on Solaris
To upgrade from the previous versions of LMS (LMS 3.2 SP1, LMS 4.01 or LMS 4.1) to LMS 4.2 on a different Solaris machine:
Step 1 ![]() Login to the machine where the previous version of LMS (LMS 3.2 SP1, LMS 4.01 or LMS 4.1) is installed.
Login to the machine where the previous version of LMS (LMS 3.2 SP1, LMS 4.01 or LMS 4.1) is installed.
Step 2 ![]() Take a backup of the LMS data.
Take a backup of the LMS data.
Step 3 ![]() Login to the machine where LMS 4.2 is to be installed.
Login to the machine where LMS 4.2 is to be installed.
Step 4 ![]() Follow the install procedure to install LMS 4.2. See Installing LMS 4.2 on Solaris.
Follow the install procedure to install LMS 4.2. See Installing LMS 4.2 on Solaris.
Step 5 ![]() Migrate the data to LMS 4.2.
Migrate the data to LMS 4.2.
To migrate and restore the LMS data, follow the procedure in Migrating Data to Cisco Prime LAN Management Solution 4.2.
Notes for Remote Upgrade
When you back up the data from LMS 3.2 SP1 and restore the data on LMS 4.2, a warning message appears stating that there is a mismatch in the applications data. You can ignore this message and continue the data restore. For more details on backing up and restoring data, seeMigrating Data to Cisco Prime LAN Management Solution 4.2 .
Note ![]() While setting up HA and DR environment in LMS server, ensure to set them prior to LMS installation. For further information on HA/DR configuration, see While setting up HA and DR environment in LMS server, ensure to set them prior to LMS installation. For further information on HA/DR configuration, see Setting Up Cisco Prime LMS in High Availability and Disaster Recovery Environment.
While setting up HA and DR environment in LMS server, ensure to set them prior to LMS installation. For further information on HA/DR configuration, see While setting up HA and DR environment in LMS server, ensure to set them prior to LMS installation. For further information on HA/DR configuration, see Setting Up Cisco Prime LMS in High Availability and Disaster Recovery Environment.
Remote Upgrade to LMS 4.2 on Windows
To remote upgrade from the previous versions of LMS (LMS 3.2 SP1, LMS 4.01 or LMS 4.1) to LMS 4.2 on a different Windows machine:
Step 1 ![]() Log into the machine where the previous version of LMS (LMS 3.2 SP1, LMS 4.01 or LMS 4.1) is installed.
Log into the machine where the previous version of LMS (LMS 3.2 SP1, LMS 4.01 or LMS 4.1) is installed.
Step 2 ![]() Take a backup of the LMS data.
Take a backup of the LMS data.
Step 3 ![]() Log into the machine where LMS 4.2 is to be installed.
Log into the machine where LMS 4.2 is to be installed.
Step 4 ![]() Follow the install procedure to install LMS 4.2. See Installing LMS 4.2 on Windows.
Follow the install procedure to install LMS 4.2. See Installing LMS 4.2 on Windows.
Step 5 ![]() Migrate the data to LMS 4.2.
Migrate the data to LMS 4.2.
To migrate and restore the LMS data follow the procedure in Migrating Data to Cisco Prime LAN Management Solution 4.2.
Notes for Remote Upgrade
When you back up the data from LMS 3.2 SP1 and restore the data on LMS 4.2, a warning message appears stating that there is a mismatch in the applications data. You can ignore this message and continue the data restore. For more details on backing up and restoring data, see Migrating Data to Cisco Prime LAN Management Solution 4.2 .
Note ![]() While setting up HA and DR environment in LMS server, ensure to set them prior to LMS installation. For further information on HA/DR configuration, see While setting up HA and DR environment in LMS server, ensure to set them prior to LMS installation. For further information on HA/DR configuration, see Setting Up Cisco Prime LMS in High Availability and Disaster Recovery Environment.
While setting up HA and DR environment in LMS server, ensure to set them prior to LMS installation. For further information on HA/DR configuration, see While setting up HA and DR environment in LMS server, ensure to set them prior to LMS installation. For further information on HA/DR configuration, see Setting Up Cisco Prime LMS in High Availability and Disaster Recovery Environment.
Verifying the Installation
You can verify LMS 4.2 installation by following either of these procedures.
Procedure 1
You can verify LMS 4.2 installation using either of these methods:
- Enter the command pdshow from NMSROOT /bin.
Where, NMSROOT is the LMS installation directory (by default, SystemDrive:\Program Files\CSCOpx and SystemDrive is the Windows operating system installed directory and for Solaris and Soft Appliance it is /opt/CSCOpx).
- Select Admin > System > Server Monitoring > Processes from the menu, to see various processes and their status.
The services that should be appear after installation are listed below. For details on the various process statuses, refer to the Managing Processes in the Administration of Cisco Prime LAN Management Solution 4.2.:
| | | |
|---|---|---|
| Common Services |
|
|
| Network Topology, Layer 2 Services and User Tracking |
|
|
| Inventory, Config and Image Management |
|
|
| Fault Management |
|
|
| IPSLA Performance Management |
|
|
| Device Performance Management |
|
|
Procedure 2
You can also verify the installation using Software Center. To verify the installation, Select Admin > System > Software Center > Software Update and the Software Updates page appears. You can verify the installation using the Products installed dialog box.
The following entry appears in the Products Installed table.
| | |
|---|---|
| LAN Management Solution | 4.2 |
Accessing LMS Server
LMS, by default, uses port number 1741 to access the LMS Server in normal (HTTP) mode and port number 443 to access the server in secure (HTTPS) mode.
To access the server from a client system, enter any one of these URLs in your web browser:
- If SSL is disabled and if you have installed the LMS on the default port, enter:
http:// server_name :1741
- If SSL is enabled, and if you have installed the LMS on the default port, enter:
https:// server_name :443
where server_name is the hostname of the server on which you have installed LMS.
The LMS Login page appears.
You can change the default web server port numbers (for HTTP and HTTPS modes) using the changeport utility. See Administration of Cisco Prime LAN Management Solution 4.2 for more information.
On a Windows system, if you are using HPOV as your third party NMS application, you would require the IIS service to be enabled for HPOV to install and run. The IIS web server runs on SSL port 443, which is the default port for the LMS web server when installing LMS. To avoid a conflict, you should change the SSL port number of the LMS web server from 443 to another port that is available, and that has a number in the range 1026 to 65535, except 6000.
Port number 6000 is reserved by Firefox, if you enter 6000 as the SSL port number, after installation (for all the three operating systems), you will not be able to launch LMS using the Firefox browser. You must ensure that you do not configure port 6000 during installation.
Note ![]() If you have accessed LMS earlier, we recommend you to clear the browser cache and delete cookies before logging into LMS again. See If you have accessed LMS earlier, we recommend you to clear the browser cache and delete cookies before logging into LMS again. See Clearing Cache and Cookies for more information.
If you have accessed LMS earlier, we recommend you to clear the browser cache and delete cookies before logging into LMS again. See If you have accessed LMS earlier, we recommend you to clear the browser cache and delete cookies before logging into LMS again. See Clearing Cache and Cookies for more information.
Note ![]() Port Scanning is not recommended in LMS. Port Scanning is not recommended in LMS.
Port Scanning is not recommended in LMS. Port Scanning is not recommended in LMS.
When you access the LMS Windows 2008 server using Internet Explorer 8, scripts are not loaded, as Internet Explorer Enhanced Security Configuration (IE ESC) is turned on in IE 8 browser, for more information see, Enabling Loading of Scripts in Windows 2008.
Clearing Cache and Cookies
The instructions for clearing the cache and cookies may be different for each browser and version. Here are the steps for deleting cache and cookies for the supported browsers and versions in LMS:
- Internet Explorer 8.0 and 9.0
- Mozilla FireFox 8.0 and 9.0
Internet Explorer 8.0 and 9.0
To clear the cache and cookies:
Step 1 ![]() Go to Tools menu.
Go to Tools menu.
Step 2 ![]() Select Delete Browsing History .
Select Delete Browsing History .
Step 3 ![]() Select the check box for Temporary Internet Files and Cookies .
Select the check box for Temporary Internet Files and Cookies .
Step 4 ![]() Click Delete . Once the files have been deleted, click Okay .
Click Delete . Once the files have been deleted, click Okay .
Mozilla FireFox 8.0 and 9.0
To clear the cache and cookies:
Step 1 ![]() Go to Tools menu.
Go to Tools menu.
Step 2 ![]() Select Clear Recent History .
Select Clear Recent History .
Step 3 ![]() Select Everything from the Time Range to Clear drop-down list.
Select Everything from the Time Range to Clear drop-down list.
Step 4 ![]() Select Details.
Select Details.
Step 5 ![]() Select:
Select:
- Cache to clear the browser cache.
- Cookies to delete the cookies.
Step 6 ![]() Click Clear Now .
Click Clear Now .
Enabling Loading of Scripts in Windows 2008
When you access the LMS Windows 2008 server using Internet Explorer 8, scripts are not loaded, as Internet Explorer Enhanced Security Configuration (IE ESC) is turned on in IE 8 browser. IE ESC reduces the exposure of your server to potential attacks from Web-based content.
To disable the Internet Explorer Enhanced Security Configuration option in IE 8:
Step 1 ![]() Select Start > All Programs > Administrator Tools > Server Manager .
Select Start > All Programs > Administrator Tools > Server Manager .
The Server Summary page appears.
Step 2 ![]() Click Configure IE ISC under Security Information.
Click Configure IE ISC under Security Information.
The Internet Explorer Enhanced Security Configuration popup appears.
Step 3 ![]() Click the Off option for both Administrators and Users.
Click the Off option for both Administrators and Users.
Step 4 ![]() Click OK.
Click OK.
Step 5 ![]() Restart the browser.
Restart the browser.
Logging into Cisco Prime LMS Server
After you have accessed the LMS server, to login for the first time, do the following:
Step 1 ![]() Enter the username in the User ID field, and the password in the Password field of the Login page.
Enter the username in the User ID field, and the password in the Password field of the Login page.
The LMS server administrator can set the passwords for admin and guest users during installation. Contact the LMS server administrator if you do not know the password.
Step 2 ![]() Click Login or press Enter.
Click Login or press Enter.
You are now logged into LMS server.
The LMS Getting Started Introduction page appears.
The new LMS User Interface provides easy access to functions based menus, access to information portlets, searching objects, fault bar, icons for viewing favorites, viewing legacy navigation, adding portlets, changing dashboard layout, and more. See Understanding the Cisco Prime LMS in Getting Started with Cisco Prime LAN Management Solution 4.2 for more information.
Uninstalling LMS 4.2
This section contains:
- Before You Begin Uninstallation
- Uninstalling LMS 4.2 on Solaris
- Uninstalling LMS 4.2 on Windows
Before You Begin Uninstallation
The following are some precautionary notes on uninstallation that you must read:
- The uninstall log file will be generated using time stamp with the YYYYMMDD_hhmmss format, for example, C:/LMS_uninstall_YYYYMMDD_hhmmss.
- The install folder will be removed and the casuser will be removed after uninstallation of LMS 4.2.
Note ![]() If the uninstallation is not performed by an administrator or a user with equivalent privileges, the uninstallation may not complete successfully. If the uninstallation is not performed by an administrator or a user with equivalent privileges, the uninstallation may not complete successfully.
If the uninstallation is not performed by an administrator or a user with equivalent privileges, the uninstallation may not complete successfully. If the uninstallation is not performed by an administrator or a user with equivalent privileges, the uninstallation may not complete successfully.
Use the Uninstall option to remove LMS files and settings. You must be logged in as administrator to uninstall.
Uninstalling LMS 4.2 on Solaris
To uninstall LMS 4.2 on a Solaris system:
Step 1 ![]() Enter the following commands as root to start the uninstall script:
Enter the following commands as root to start the uninstall script:
# cd /opt/CSCOpx/bin/
where /opt/CSCOpx is the default installation directory.
Step 2 ![]() From the /opt/CSCOpx/bin/ directory, enter the ./uninstall.sh command
From the /opt/CSCOpx/bin/ directory, enter the ./uninstall.sh command
Note ![]() We recommend you not to use /opt/CSCOpx/bin/ We recommend you not to use /opt/CSCOpx/bin/uninstall.sh command to uninstall LMS
We recommend you not to use /opt/CSCOpx/bin/ We recommend you not to use /opt/CSCOpx/bin/uninstall.sh command to uninstall LMS
The uninstall messages get appended to the /var/tmp/LMS_uninstall_20060623_102035.log.
The following message appears:
LMS is currently installed in the server. Delete the configured collectors to remove the corresponding collector entries from the source routers, and uninstall LMS. Enter 'C' to quit the uninstall and manually delete the collectors using IPSLA Performance Management CLI. Enter 'Y' to delete the collectors in the device and continue with the uninstall.'N' to continue with uninstall without deleting the collectors in the device. Default value is 'N'.
You should do either one of the following:
- Enter c to quit the uninstall and manually delete the collectors using IPSLA Performance Management CLI.
- Enter y to delete the collectors in the device and continue with the uninstall.
- Enter n to continue with uninstall without deleting the collectors in device
The uninstallation proceeds.
After the uninstall is complete, the following messages appear:
All files were deleted successfully.
Possible Warnings/Errors Encountered
The uninstallation program lists the warning and error messages.
Step 3 ![]() Check the following files after uninstallation and ensure to perform the following:
Check the following files after uninstallation and ensure to perform the following:
- /etc/syslog.conf
Ensure that the following entry is removed: local0.emerg;local0.alert;local0.crit;local0.err;local0.warning;local0.notice;local0.info;local0.debug /var/adm/CSCOpx/log/dmgtd .log .
- /etc/services
Ensure that port assignments for LMS 4.2 have been removed.
- /etc/inetd.conf
Ensure that the LMS TFTP entry is removed.
Uninstalling LMS 4.2 on Windows
To uninstall LMS 4.2 on a Windows system:
Step 1 ![]() Go to the Windows desktop and select Start > Programs > Cisco Prime LMS > Uninstall Cisco Prime LMS .
Go to the Windows desktop and select Start > Programs > Cisco Prime LMS > Uninstall Cisco Prime LMS .
Uninstallation process begins .
The following message appears:
LMS is currently installed in the server. Delete the configured collectors to remove the corresponding collector entries from the source routers, and uninstall LMS. CLick "Cancel" to quit the uninstall and manually delete the collectors using IPSLA Performance Management CLI. Click "Yes" to delete the collectors in the device and continue with the uninstall. Click "No" to continue with uninstall without deleting the collectors in device. Default is 'No'.
You should do either one of the following:
- Click Cancel to quit the uninstall and manually delete the collectors using IPSLA Performance Management CLI.
- Click Yes to delete the collectors in the device and continue with the uninstall.
- Click No to continue with uninstall without deleting the collectors in device
The uninstallation proceeds and the Uninstallation Complete dialog box appears after uninstallation completes.
If the uninstallation completes with errors, the following error message appears:
Installation of Cisco Prime Lan Management Solution 4.2 completed. Some errors occured during installation. See NMSROOT /Cisco_Prime_uninstall_YYYYMMDD_hhmmss.log for details.
Step 2 ![]() Select Yes, I want to restart my computer now and click Finish .
Select Yes, I want to restart my computer now and click Finish .
Re-installing LMS 4.2
Re-installation is installing the product over the existing one without performing an uninstallation.
You can re-install LMS 4.2 by running the installation program on the system currently running the product. LMS 4.2 supports new installation and re-installation of applications at the same time.
Re-installation preserves the settings from the previous installation.
To reinstall LMS 4.2, follow the similar procedure as detailed in Performing Installation of LMS 4.2.
Notes for Re-installation
- During re-installation, you can choose to enter new passwords or retain the existing ones. For more information on passwords, see Password Information.
- You will be prompted to provide a backup location.
- In Windows, locked files window might appear during re-installation.
The locked files list:
–![]() Appears when some dll or exe located in NMSROOT has valid reference handles in the memory during installation.
Appears when some dll or exe located in NMSROOT has valid reference handles in the memory during installation.
–![]() Appears so that you can stop or kill the file that uses this dll for the installation to proceed, else the installation will crash due to overwrite of the files loaded in the memory.
Appears so that you can stop or kill the file that uses this dll for the installation to proceed, else the installation will crash due to overwrite of the files loaded in the memory.
You can verify the exe that locks the dll by using the process explorer tool available at the Microsoft site at: http://technet.microsoft.com/en-us/sysinternals/bb896653.aspx
- In Windows, if the WMI service is up and running, the following message appears when installation starts:
Windows Management Instrumentation (WMI) is running. This locks processes and impedes installation. To avoid WMI conflicts, this Setup program will stop and immediately restart the WMI service.
Do you want to proceed?
Click Yes to proceed with this installation. Click No to exit installation.
Click Yes and proceed with the installation.
Downloading and Installing CiscoWorks LMS 4.2 Using Windows 2012 Patch
To install the LMS 4.2 using Windows 2012 patch on Windows 2012 servers for the first time (fresh installation of LMS 4.2):
Step 1 ![]() Go to http://software.cisco.com/download/release.html?mdfid=284259296&flowid=37207&softwareid=280775103&os=Windows&release=4.2.0&relind=AVAILABLE&rellifecycle=&reltype=latest
Go to http://software.cisco.com/download/release.html?mdfid=284259296&flowid=37207&softwareid=280775103&os=Windows&release=4.2.0&relind=AVAILABLE&rellifecycle=&reltype=latest
Step 2 ![]() Download the patch for Windows 2012 Server Standard and Data Center to your system. The Checksum value is 1976262964 4202712.
Download the patch for Windows 2012 Server Standard and Data Center to your system. The Checksum value is 1976262964 4202712.
Step 3 ![]() Go to the directory where you have downloaded the patch and double-click CiscoPrime_LMS_4.2_WIN12.exe.
Go to the directory where you have downloaded the patch and double-click CiscoPrime_LMS_4.2_WIN12.exe.
The following message will pop up:
A new window opens and you can browse to the location in your local hard drive where the LMS 4.2 image is stored or you can select the installable from the DVD.
If you select an unsupported Windows installable, the following message appears:
You have chosen an incorrect setup file. Select LMS 4.2 setup.exe to continue with installation. For more information on performing a new installation of LMS 4.2 see,
http://www.cisco.com/en/US/docs/net_mgmt/ciscoworks_lan_management_solution/4.2/install/guide/instl.html#wp1602146
The installation of LMS 4.2 along with Windows 2012 patch will take approximately the same time as that of LMS 4.2.
Note ![]() You can reinstall LMS 4.2 using the Windows 2012 patch by following the procedure given above. You can reinstall LMS 4.2 using the Windows 2012 patch by following the procedure given above.
You can reinstall LMS 4.2 using the Windows 2012 patch by following the procedure given above. You can reinstall LMS 4.2 using the Windows 2012 patch by following the procedure given above.
Note ![]() You can apply only LMS 4.2.5 patch on LMS 4.2 in Windows 2012. You can apply only LMS 4.2.5 patch on LMS 4.2 in Windows 2012.
You can apply only LMS 4.2.5 patch on LMS 4.2 in Windows 2012. You can apply only LMS 4.2.5 patch on LMS 4.2 in Windows 2012.
Cisco Prime Lan Management Solution_4_2.iso
Source: https://www.cisco.com/c/en/us/td/docs/net_mgmt/ciscoworks_lan_management_solution/4-2/install/guide/install/instl.html
0 Response to "Cisco Prime Lan Management Solution_4_2.iso"
Post a Comment